Please note this article was found in google archive. All credit goes to the author Steve Brauning.
How to Build The Messerschmitt Me262 Family in 1/48 scale
How to Build The Messerschmitt Me262 Family in 1/48 scale
 By Steve Brauning
How to Build The Messerschmitt Me262 Family in 1/48 scale
Written and published by Steve Brauning Revised March, 2005
Software: Word
Printer: HP 1015
I welcome comments and constructive criticism, and will answer questions, by mail or e-mail. : stevebrauning@yahoo.com
See my web page at: www.oocities.com/stephen.mark/scale.htm
See my web page at: www.oocities.com/stephen.mark/scale.htm
CONTENTS:
Lists of Model Kits and Supplies: -----------------------------------Pages 1-3
Lists of Model Kits and Supplies: -----------------------------------Pages 1-3
General Notes for all Kits ----------------------------------------------Page 3
Deciding on a Version --------------------------------------------------Page 4
Variables -------------------------------------------------------------------Page 5
General Construction and Flight Surfaces Repositioned -----Page 5
Wing Diagram ------------------------------------------------------------Page 5
General Finishing, Panel Lines, Painting--------------------------Page 8
Paint Chart ----------------------------------------------------------------Page 10
Me262 stencil markings and placement --------------------------Pages 11-14>
Canopy & Antennas ----------------------------------------------------Page 14
Kit Reviews: Monogram #5453 -------------------------------------Page 15
Comments on Trimaster mold kits----------------------------------Page 16
Landing Gear Diagram -------------------------------------------------Page 18
Trimaster mold kit reviews: DML/Dragon, Revell, Italeri-------Page 19
Tamiya Kit Review ------------------------------------------------------Page 23
Comparison of Dihedral------------------------------------------------Page 23
Conversion Kits: ARBA, Black Eagle, Antares, etc -------------Pages 25-27
References -----------------------------------------------------------------Pages 28-29
The Messerschmitt Me262 has continued to capture the attention of scale modeling enthusiasts. In this article, I will attempt to provide to the 1/48 scale modeler a thorough resource on all the kits, conversions, parts, detail sets, and decals that are available. Right now there is a flurry of activity in this sector and there are new items coming out and being announced all the time. I welcome reports of any items that I may have missed or that come out after this is published.
LISTS OF MODELS AND SUPPLIES OF MESSERSCHMITT ME262 IN 1/48 SCALE
LISTS OF MODELS AND SUPPLIES OF MESSERSCHMITT ME262 IN 1/48 SCALE
1. COMPLETE KITS:
DML/ Dragon #5519 Me262 B-1a/U1 Nachtjager; #5535 Me262 A-1a/U3 Photo-Recon; Me262 Mistel composite. (for more DML/Dragon, see Trimaster listings) Occasionally re-issued.
Hasegawa/Revell #HM166 Me262A-1a JG7; & #HM179 Me262A-1a Galland.) (Monogram re-issues; Out Of Production-OOP)
Hasegawa #86819 Messerschmittt Me.262A, 'Kommando Nowotny' (Dragon reissue; OOP)
Italeri #2613 Me262A-1a Schwabe. (Re-issue of DML #5507; OOP)
Lindberg Me262 kit hardly is worth mentioning: lots of errors
Monogram #5410 & #5453 Me262 A-1a Schwalbe (OOP)
Nichimo Me262 - don't bother - it's the same exact thing as the Lindberg
Revell/AG (Germany) #4509 Me262A-1a Nachtjager(re-issue, of DML 5507 & 5515 combined; OOP)
Trimaster #MA-10, reissued as DML/Dragon #5523 Me262 A-1a/U4 Polkzerstorer; #MA-11, reissued asDML/Dragon #5529 Me262 A-2a/U2 Schnelbomber; #MA-12, reissued as DML/Dragon #5507 Me262 A-1a Jabo; #MA-16, reissued as DML/Dragon #5515 Me262 A-1a Nachtjager "V 056". All OOP.
Tamiya #61082 Me262A-2a all new tooling in 2002, incl. Kettenkrafterad tow vehicle & 3 figures; #61087 Me262A-1a Fighter; #61091 Me262 A-1a Clear Edition.
2. DECALS:
Aeoromaster: #48107, 48112, 48336, & 48337 "Sturmbirds 1 -4; #48223 "Bodenplatte 2" (OOP)
Cutting Edge Modelworks #48052 Me262A/B; #48053 Me262 "Scale Color" National Insignia; #48054 JG7 Special; #48068 Luftwaffe Recon Fighters; # 48087 ; #48103 Me262 #2 "tadpole tail" decals
Eagle Editions - #44 & #29, misc. Me262's(www.eagle-editions.com)
Eagle Strike Prod. #48007 "Me262 Sturmbirds #1; 48063 & 64 "Too Little Too Late"#1 & 2 (www.eaglestrikeproductions.com)
Experten Decals ED-2a "Check Mate: Chequerboard '262's" OOP, very rare
Extra Tech Decals: stencils for “A” & “B”
KommanDeur Decals #4801FD (OOP)
Ministry of Small Aircraft Production #4803;& #4824
Superscale Decals, #48552 & 48553 Me262's
“Tally Ho” #48026, Czech C-92 markings, KG51, etc
Ventura - #4859. captured '262's w/ US insignia; # 4803 Me Bf.109's and Me.262 (Roll Models)
War Eagle #WED010 "Luftwaffe 2 Seaters" for nightfighter & trainer(OOP)
XtraDecal # X019-48 Swastikas
The best decals I have seen are Cutting Edge and Experten(OOP), by far, with top notch printing and carrier film, no gunk, and excellent documentation. Aeromaster, Eagle Editions and Eagle Strike are very good too. Many of them are out of production(OOP), so look on-line, in hobby shops and at shows.
3. AFTERMARKET PARTS, CONVERSIONS, ACCESSORIES
3. AFTERMARKET PARTS, CONVERSIONS, ACCESSORIES
Antares Models Resin Conversion kits - Mistel; HG-1, 2, 3; Lorin; “W”, etc (from Argentina, www.antaresmodels.comand e-mail - antaresmodels@aol.com )
Aires #4116 Me262A Gun Bay; 4145 Me262A Engine Detail; 4146 Me262 Wheel Set (3); 4148 Me262A Cockpit & Wheel Bay; 4150 Me262A Cockpit Set; 4158 Exhaust Nozzles for Tamiya kit; #4206 leading edge slots for Tamiya.
Airwaves # 48031- Photoetched parts; 48033 Resin reconnaissance parts - fairings only.
ARBA Conversion kits #009 Recce Nose; #010 Cannon Nose; #044 & #048 Schnellbombers; #051 Lorin Conversion; #?? Me262 B-1a/U1 multi-media conversion(OOP)
Black Eagle #4803 Me 262 Recce Nose Conv ; #4804 - Trainer conversion kit
Cutting Edge Modelworks & Black Magic Masks:#48131 Reich Defense Bands Masks; #48132 Wheel Hub Masks; #48290 RLM 81/82 Camouflage Masks; #48311RLM 74/75 Camouflage Masks; #48248 Flying Control Surfaces & Slat Inserts for DML/Trimaster; CUTTING EDGE RELEASES FOR THE 1/48 TAMIYA KIT -48368 Super Detailed Cockpit ; 48369 Slats & Slat Inserts; 48370 Bulged Main Wheels with correct hexagon tread--they claim to be the only correct tires ever done for the 262!; 48371 Four-Gun Cover; 48375 Aufklaurer (Recce) Conversion inc. gun cover with faired-over gun ports, “Clear Cast” camera port panels (with BlackMagicTM masks), camera bulges, and optional cannon barrel
Czech Master #4074 Me262A/B - engine set for Revell/DML; 4075 A/B - armament set for Revell/DML; For Tamiya: 4111 Me262A-1a & V056 conversion; 4112 Me262A-1a/U3 (photo) conversion; 4113 Me262B conversion; 4114 Me262A Details; 4115 Me262A Engines; 48101 German pilots for Me262
Eagle Editions #30-48, slats #31 Fighter Nose; for the Tamiya kit
Eduard #48153 Photo-etch for Monogram kit; # 48205 P.E. for Revell kit; camouflage and canopy masks
Engines & Things #48094 Hobbycraft Ar234 engine inlets(pair); #48095 Jumo 004 w/ nose cowl
Extra Tech Access. 48501 Me.262 Insignia template; #4802 Jumo engines
E-Z Mask #140 Me262A-1a & 2a/U2 Canopy Mask; #141 Me262A Canopy Mask
Highflight #4835 Resin conversion for rocket Me262C; #4843 BMW engines for Me262A-1b (OOP)
Insight - ID48001 Luftwaffe "Pole-Tow" Bomb. experimental 1,000 lb towed Bomb
Lone Star Models #0160 Me262 cockpit & “Four-In-One” Multi-media kit to convert the Monogram kit to the A-1A/U3 or U4, the B-1a, or the B-1a/U4. OOP; www.lonestarmodels.com
Medallion Models Me262 Multimedia resin & metal parts for Monogram - OOP, no longer available
Missing Link Me262B conversion kit for Monogram, resin & vacuform - OOP, no longer available
Parts Accessories 48103 Me262A-2a Detail –AMAZING photo-etched set.
Reheat #RH071 Luftwaffe Accessories PE set.
True Details #48061 Resin wheels; #48808 Photoetched parts
Ultra-Cast - Me 262 Seats
Verlinden Productions #1387 Me262A/B Multimedia Detail Set - resin and metal; #1846, resin and photo-etched detail set for Tamiya.
Velocette Scale Models: vacuform & resin conversion kits for Me262B-1 & B-3 P.O. BOX 1117, MONTCLAIR, NJ 07042-1117
Wingz: #0002 - Resin set w/ slats, flaps, etc
Wingz: #0002 - Resin set w/ slats, flaps, etc
Parts Accessories is the best photo-etch set; Eduards is next, especially #48205). They are the most complete and contain "sandwich" instrument panels, including instrument face placard. Of the conversion kits, ARBA's are of variable quality, and hard to find. One is reviewed here. Black Eagle and Antares are reviewed here, and are generally very good. Highflight's kits were not reviewed. Of the multi-media detail sets, Verlinden's is very good and has many internal, engine, and cockpit parts in resin and photoetch. Some of the resin parts don't fit and the PE is very thick, but it's still worthwhile. Cutting Edge's resin flying surfaces are just right. I will mention these parts, as well as the Medallion and the Lone Star parts, at appropriate places throughout this booklet. The Czech Masters sets are excellent in quality and in quantity- you get a lot of stuff in each set! Aires are good; Engines and Things have poor quality castings.
AVAILABILITY: To find any of these kits, decals, or accessories, use the search engines on the web pages of the on-line hobby stores, like Aviation Usk(www.aviationusk.com), Great Models (www.greatmodels.com), Squadron (www.Squadron.com), Meteor Productions (www.meteorprod.com), Hannants (www.hannants.co.uk - in England), Roll Models(www.rollmodels.net), and others. Just put in “262”, “Me262”, or “Me 262”. Specify the scale also, to limit the number of items and make your searching easier. For searching eBay, Yahoo auctions, and other on-line auctions, go to their toy, scale model, or model kit categories and do the same kinds of searches.
AVAILABILITY: To find any of these kits, decals, or accessories, use the search engines on the web pages of the on-line hobby stores, like Aviation Usk(www.aviationusk.com), Great Models (www.greatmodels.com), Squadron (www.Squadron.com), Meteor Productions (www.meteorprod.com), Hannants (www.hannants.co.uk - in England), Roll Models(www.rollmodels.net), and others. Just put in “262”, “Me262”, or “Me 262”. Specify the scale also, to limit the number of items and make your searching easier. For searching eBay, Yahoo auctions, and other on-line auctions, go to their toy, scale model, or model kit categories and do the same kinds of searches.
GENERAL NOTES FOR ALL KITS
The Monogram kit is old and currently out of production(OOP). Trimaster went out of business years ago and the kits are hard to get and expensive. Clones of various quality of the original Trimaster molds have been reissued by DML/Dragon, Revell AG, Italeri, and Hasegawa. Most of these are OOP too, and must be sought out at hobby shops and shows, eBay, etc.. The new Tamiya kits coming out now supercede all the previous offerings.
The Monogram kit is old and currently out of production(OOP). Trimaster went out of business years ago and the kits are hard to get and expensive. Clones of various quality of the original Trimaster molds have been reissued by DML/Dragon, Revell AG, Italeri, and Hasegawa. Most of these are OOP too, and must be sought out at hobby shops and shows, eBay, etc.. The new Tamiya kits coming out now supercede all the previous offerings.
There are many small details that are important to maintain, add, or otherwise deal with when building the Messerschmitt 262. The kits themselves provide information for some of these, but others have to done with other references: books, magazines, or other sources help you build an accurate kit. The Internet has a wealth of information if you know where to look. Newsgroups (Rec.Models.Scale), Luftwaffe sites, Me262 specialty sites, discussion forums, etc. are helpful in order to produce a higher level of accuracy. See the Reference section for a listing of some of the best resources out there.
Next it is important to set some parameters for the following reviews. I want to clarify that these are not professional reviews or "infomercials", rather, they are written by a modeler for modelers. I happen to like the Messerschmitt Me262, have researched quite about them, and have built quite a few kits. I am putting down on paper what I have learned and making it available to others, with the hope that the information will be helpful to other for many for future projects.
Also it would be helpful if I state my modeling philosophy here. I build for the enjoyment and relaxation of the process, and I also like displaying the finished product. I do not overly seek perfection in either the process or the product, but I try to do the best I can in both areas. Part of this philosophy is an emphasis on THE BASICS. Things like filling and sanding seam lines, fine detailing of sub-assemblies, researching sources, etc. are givens here, but it never hurts repeating them. I will only mention a few techniques that perhaps are particularly useful for these kits. All the aftermarket stuff, fancy paint jobs, extra weapons, etc., do not make up for simple basic modeling techniques and skills. But adding these in addition to the basics can make a big difference in the final product. It's also fun!
There are quite a few great kits and accessories out there. But none are perfect, far from it. Any one you choose will require quite a bit of work to arrive at a decent build-up. The quality varies between manufacturers, and the defects (challenges) are quite different. If I had to pick one that I liked the best out of all of them, it would be tough. But I do review and give some recommendations. The best thing though is to experiment for yourself and decide.
Deciding on a version
There are many Me262 variants, and there are quite a few kits available for many versions, as listed above. Some were prototypes, some operational versions, and others were paper projects that never were actually built. For complete listings, check out other resources. Here are a few interesting options:
1. Prototype aircraft: There were tail draggers and prop-driven planes. Some had a different type of canopy, and some had fixed landing gear. Some were solid colors, perhaps RLM 02 gray or light gray primer. Since there are no kits, most of these variations would have to be scratch built in 1/48 scale and the markings would have to be painted.
2. Czech Avia S-92(fighter) & CS-92(trainer): refurbished or completely rebuilt post-war from scraps, and painted all RLM 02, light gray or natural metal. Czech markings are available on the “Tally Ho” set # 48026. The MBI book is the best resource, and there is a walk-around on Hyperscale.com.
3. Alternate Powerplants: Due to problems with and a lack of Junkers Jumo engines, alternate powerplants were utilized on some Me262's. Highflight Kits offered a conversion for the Me262A-1b BMW-powered planes(OOP), and Antares Models has several versions, powered by Ramjet engines like those used on the V1 “buzz bomb”.
4. Addition powerplants filled the “need for speed”. The “Lorin” version had huge ramjet engines mounted on top of the wing, above the standard engine gondolas. The ARBA had an OOP resin kit, but Antares offers one with excellent quality aluminum parts. Other versions had internal or external rocket engines, some of which are available from Highflight or Antares.
VARIABLES
There are a number of variables that must be settled about all '262's, in order to be accurately represented. They are items that were changed in production or in the field, and generally are an either/or choice. The best way to decide is to examine the photographic evidence for the specific aircraft in question. Here is a list of some of the main variables, even though there may be others.
There are a number of variables that must be settled about all '262's, in order to be accurately represented. They are items that were changed in production or in the field, and generally are an either/or choice. The best way to decide is to examine the photographic evidence for the specific aircraft in question. Here is a list of some of the main variables, even though there may be others.
VARIABLE-
|
DETERMINING FACTOR
|
1. Rear canopy armor plate
|
Varied with individual aircraft: most common on fighters
|
2. Torsion link on the front landing gear strut
|
Only early production models had it
|
3. Bulge on gun bay doors
|
Varied in production: photos hard to distinguish
|
4. Upper cannons
|
Most A-2a models didn't have them
|
5. "Wikingerschiff" or ETC 503 bomb rack
|
“Wikingerschiff" was most common; ETC was late war (Jabo kit comes with both
|
6. Height of camouflage demarcation line on fuselage and engine nacelles -
|
Varies with individual aircraft; early aircraft had high line
|
7. Amount of mottling on tail; "tadpole"
|
Varies with individual aircraft; certain series and units painted such
|
Varies with unit and aircraft
| |
9. Rear navigation light on lower rudder: large or small
|
Early models had large light
|
10. Interchangeable parts, like access panels, flaps, etc can be painted different colors (primer, aluminum, other camo schemes)
|
Varies with aircraft. Look for documentation.
|
GENERAL CONSTRUCTION POINTS
1. REPOSITIONING FLIGHT SURFACES
A. Leading Edge Slats: The Me262 has leading edge slats that deploy automatically at low speed, so that on the ground they were always extended. I do this on all my models. It is tricky, but well worth it.
Outboard strips ---------------------------------------- Inboard strips
<Slats shown fully extended. <sheet styrene strips extend to original leading edge(dotted line).
< Positions of Actuator rollers
< Positions of Actuator rollers

<Flaps shown fully lowered
Kit differences: There are significant differences between the different manufacturers that effect this process. The first is wing lengths. Each of the different kit families has different length wings. This mainly affects the outboard strips and slats and the positions of the actuators. Here is the breakdown:
The Monogram wing, shown in image #2, is the shortest. The Verlinden set, made for Trimaster/DML, works for slats and flaps on the Monogram kit, but are too short for the Trimaster mold kits.
Trimaster mold wing is slightly longer(1mm) than Monogram wing. Use Cutting Edge slats set(#48248). It has separate pieces for the slats and the bases, which are the exact size and shape. The only thing is that the resin support rollers are so fragile, and several on my set were broken before I got them. They can be replaced with photo-etch or other scrap pieces(see instructions below). Also this set has flaps, horizontal stabilizers and a rudder.
The Tamiya wing is 2mm longer than Trimaster's! Use the Aries, Eagle Edition or Cutting Edge #48369 slat sets, which were made for Tamiya. All three produce excellent results.
With any of the kits, one can use aftermarket products or simply use the original kit material. Both techniques are explained below.
The second difference is wing structure, which affects the steps for removing the slats & flaps.
The second difference is wing structure, which affects the steps for removing the slats & flaps.

For all the different kits, you should finish this step before attaching the engine gondolas, since you will have more room to work. Another complication is painting the wings' camouflage pattern: it is easier to lay out and paint the various splinter and mottle patterns BEFORE removing the slats and flaps. In that case, make sure that you thoroughly scribe the lines, so that the pieces can be separated without damaging the paint. See the note about this below.
For all kits, take note when gluing the wings together, not to glue the wider top slat to the bottom wing.
Step 3, for all kits: prepare the supports. To form the interior support bases for the slats, add thin strips of 20 or 30 thousandths sheet styrene to the openings, positioned about 0.5mm down from the top wing surface, and extending out to the original leading edge of the wing. On the outboard slats, glue the strips to the bottom, but at the wingtip, the strip should be thinned. Do this by scrapping or sanding once the strips are glued in and set up. On the Trimaster molds, the inboard strips need a spacer under them to gain the correct wing thickness: use another set of styrene strips for this. Paint the strips RLM 66. If using aftermarket products, follow their instructions for this and the remaining steps.
CONSTRUCTION TIP: CUTTING WITH THREAD To cut off parts like flaps, etc. Hold a piece of sewing thread like dental floss, tightly wrapped around your index finger of each hand. Then move it in a sawing motion along the line to be cut. If the line isn't well defined, scribe it first. Just be careful to keep on the line, because it can get away from you. On these kits, you can use this method to cut off the leading edge slats, the flaps, and the horizontal stabilizers. Chose a thin but strong thread, since the cuts will be as thick as the thread diameter. You will notice that it is not actually cutting, but is melting the styrene by friction.
|
Step 4: more support! Add small (approx. 0.5mm by 3mm) metal strips at the correct locations on the styrene strips, to simulate the actuator rollers. The DML and Trimaster photo-etched sets yield such resources(see Image #2 for locations of rollers). Note the "rollers" will get progressively longer as you move inboard. They should stick out about 1mm from the front of the styrene strips.
Step 5: thin the slats themselves down to about 0.5mm, removing material by shaving and sanding just from the bottom surface. In order not to damage the slats, lay them top down on a piece of soft cloth, and scrape by dragging a sharp hobby knife blade sideways along the full length of the slat. Check regularly to keep it even, until you reach the correct width.
Step 6: reposition the slats as per references. They should be glued onto the metal "rollers" so that there is a slight gap visible between the styrene strip and the slat.
Painting slats: If you haven't done so already, paint the camouflage pattern, taking care to keep it correctly lined up. You could have painted the pattern before even cutting the parts off. It would be easier than trying to line up the pattern, but also may mean you'll damage the paint job later. Although the internal support is normally painted RLM 66 or 02, it is even legitimate in some cases to paint right over the whole surface including the open strips and slats with the topside colors and pattern. There is a series of photos clearly showing this in the Schiffer book, "Me262 - Development, Testing, and Production" by Radinger and Schick, page 90.
B. Flaps: Most photos show Me262's on the ground with flaps down. Repeat steps 1 & 2 for removing the slats, just this time do it on the flaps. Most of the pointers there apply here. One could use resin flaps from the above mentioned sets, but I found that the Verlinden flaps(outboard) were about 1mm too short. The Cutting Edge parts are adequate, and the 48369 set has flap supports for inside the wing: NICE!!!.
Although, just as with the slats, the original kit pieces can be used. They need a small piece of styrene or putty filler on the exposed interior part. Here's a trick: take the flaps from one side and turn them upside down and use them on the opposite side of the plane. That way the tops look perfect. Glue in position as per references(Images #3, 4). They can be placed at just about any angle, since photos show them in various positions. The interior surfaces exposed should be painted RLM 02.
IMAGE #4 Monogram Kit with slats and flaps repositioned


C. Horizontal Stabilizers(elevators): these also are almost ALWAYS seen in the raised position, since they apparently both landed and took off that way. This is easy to do. Just cut off and reposition as per references. The small tab, the elevator balance horn, may need to be added with styrene. As with the flaps, the exact position is not critical. Aftermarket products are available and even included in several of the sets mentioned in this article, but are not really needed since the original parts are useable.
2. INTERNAL DETAILS
The gun bay, the cockpit, the engines, and other internal parts, offer opportunities for super-detailing. Many of the detail and conversion sets listed above offer parts for these, and most have adequate instructions. When combining these with careful research, one can recreate very accurately the details. I would always recommend super-detailing the cockpit, and will provide information in the reviews, below. For other internal details, see the corresponding kits and sets, and the appropriate resource.
3. GENERAL FINISHING POINTERS
It is important to keep in mind the rough and difficult conditions under which most of these aircraft were built and operated, especially in the final assembly, delivery, and of course under combat conditions. These effects, such as scratches, chipped paint, dents and dings can be reproduced by weathering and also by allowing surface imperfections. I am rather unconcerned about minor imperfections on the model and paint, because they help reflect the fact that these were "used" airplanes. There were also the wrinkles from the construction process. FineScale Modeler has an article(October '97) on a scratch built Me262 in 1/32 scale, in which the builder purposely allowed surface irregularities to replicate those seen on real aircraft.
A. Panel lines
On the Me262, most of the panel lines were filled with putty and sanded smooth during construction. That is easily seen especially on side photos of unpainted aircraft. To replicate this on scale models, panel lines should be filled and sanded smooth too. In fact, on something as small as 1/48 scale, most panel lines should be almost undetectable. See all those beautiful recessed lines on the Trimaster mold and Tamiya kits? Get rid of them! Tamiya has deeper and wider lines and is therefore more crucial to do. However, where the lines were filled and sanded, there may be slight variations visible in the finish.
The only lines that should not be filled are the following:
1. around access panel lines, like fuel fillers and cells, kick-in steps, gun bay access covers, and engine nacelle panels;
2. around all flight surfaces;
3. at joint lines where major components are joined: fuselage to wing, nose section to center section, and tail section to center.
I started doing this several years ago, after building several ‘262’s. But now I do on all of them. I have two methods to fill in panel lines:
Method 1. Fill with putty. Use of regular putty (Squadron Green, white, etc.) is very tricky and time consuming. "Mr. Surfacer 500" by Gunze Sanyo, a liquid putty is better. This should be applied before painting. First, put a strip of masking tape on both sides of the line to form a thin “channel” with ridges on both side. Make it about 2mm wide. Then, apply the putty as you are accustomed to for seams, or use “Mr. Surfacer 500” using a thin paintbrush. Immediately wipe off the excess. And I mean immediately - that stuff begins drying in seconds. I have been using a small piece of a car windshield wiper, like a squeegy, to wipe off the excess. That way I don't remove too much. Regardless of how you do it, there will be some excess left inside the channel. After a minute or two, remove the masking tape and lightly wipe the line down with a mild solvent to remove excess putty. Use Gunze thinner or Nail Polish Remover with Acetone on a cotton swab. Neither of these solvents will attack the plastic(although they will attack paint, even dried enamels). Don’t get too enthusiastic as you will just remove all the putty. After the putty dries, sand the surfaces down smooth. You want a smooth surface, even though there may be a slight variation in the finish. Another option would be using thickened paint.
Method 2. Apply thin decal strips. Paint some decal film RLM 02 or another pale color. Cut into thin(about 2 mm) strips. After a primer coat and clear gloss on the model, apply the strips over all panel lines, then repaint the aircraft. You may have to sand the surfaces to smooth them.
(INSERT IMAGE #5 HERE - “Decal strips applied to cover panel lines”

The Monogram kit has raised lines, which should be lightly sanded smooth. Be careful not to wipe out all the detail like access hatches, etc.
Also, the Me262 had a panel line seam down the spine of the rear fuselage section, behind the cockpit, both top and bottom. This is very hard to confirm since there are few photos of the aircraft from this angle, but it has been shown in a few rare photos and by comments from persons who have examined aircraft. Some instructions from Trimaster/DML and Hasegawa kits show it, too. Depending on how your glue seam comes out, you can lightly sand and/or scribe. Be careful of the fuel filler access covers just fore and aft of the cockpit: they are VERY difficult to replicate once sanded away. The Verlinden update set has photoetched covers. These parts are too thick to apply to the surface, and must be sanded down. They are also useful if you want to drill out the openings and display the covers in an open position. There is ample reference material for this.
Also, the Me262 had a panel line seam down the spine of the rear fuselage section, behind the cockpit, both top and bottom. This is very hard to confirm since there are few photos of the aircraft from this angle, but it has been shown in a few rare photos and by comments from persons who have examined aircraft. Some instructions from Trimaster/DML and Hasegawa kits show it, too. Depending on how your glue seam comes out, you can lightly sand and/or scribe. Be careful of the fuel filler access covers just fore and aft of the cockpit: they are VERY difficult to replicate once sanded away. The Verlinden update set has photoetched covers. These parts are too thick to apply to the surface, and must be sanded down. They are also useful if you want to drill out the openings and display the covers in an open position. There is ample reference material for this.
B. Painting
Following is a color chart to clarify any confusion in the designations given in the different kit instructions. I don't know why these manufacturers can't give straight-forward RLM #'s. The only one that does so consistently is the original Trimaster, so they aren't on this chart because their instructions and color designations are clear as a bell(except for the RLM 82 -83 confusion indicated below - simply use the color name in that case). So depending on which kit you have, follow the simple chart below to determine the correct colors.
COLOR CHART FOR ME262 KITS IN 1/48 SCALE
RLM # & COLOR
|
XTRA-COLOR
|
DML/-DRAGON
|
REVELL/ AG
|
MONOGRAM (kit #)
|
TAMIYA
|
HASEGAWA/REVELL
|
ITALERI
|
RLM 66,Schwartz-grau
|
X203: RLM 66,Schwartzgra
|
95% H32/40 + 5% H12/33
|
I -Panzer- grau
|
#5410- M Dark Gray #5453 -C Dark Gray
|
XF-63, German grey
|
#116, RLM 66 Black Gray
|
Refer to instructions
|
RLM 02,Grau
|
X201: RLM 02 Grau
|
H70/60
|
F(mix) or C -Helloliv
|
#5410- M Dark Gray #5453 -D Light Gray
|
XF-22, RLM grey
|
#60, RLM 02 Gray
|
Refer to instructions
|
RLM 81,Brunviolett
|
X210 RLM 81, Brunviolett
|
H309
|
P -RLM 81 (mix)
|
#5410- J Olive Drab #5453-G Olive Green
|
not given
|
#121, RLM 81 Brown Violet
|
Dark Green
|
RLM 82, Lichtgrun
|
X212 RLM 83, Lichtgrun
|
H304
|
J -RLM 82 Bronzgrun
|
#5410 - C Green
#5453- Not given
|
AS-23 Light Green, Luftwaffe
|
#122 RLM 82 Light Green
|
Pale Green
|
RLM 83,Dunkel-grun
|
X211 RLM 82, Dunkelgrun
|
Unclear,
check each kit
|
Not given
|
#5410 K Black Green #5453 H Dark Green
|
AS-24 Dark Green, Luftwaffe
|
Not Given
|
Not given
|
RLM 76,Lichtblau
|
X208 RLM 76, Lichtblau
|
H314
|
F RLM 76 (mix)
|
#5410- Light Blue #5453 K Light Blue
|
AS-5 Light Blue, Luftwaffe
|
#117, RLM 76 Light Blue
|
Light Ghost Gray
|
The above chart indicates the fact that RLM numbers for Lichtgrun and Dunkelgrun have been consistently mixed up by model and paint companies, apparently because of an error in the first edition of the industry standard "The Official Monogram Painting Guide to Luftwaffe Aircraft". Throughout the entire publication, the two were reversed. Later, the authors issued a "Errata-Omission" sheet in which they corrected this, but companies like DML and Xtracolor, and many others, still use the incorrect designations. I have tried to adapt to the corrections. I am indebted to David Brown and David Wadman of Experten Decals for bringing this to my attention.
There were many either completely or partially unpainted Me262's found in dispersed factories or even in operational units at the end of the war. To accurately replicate unpainted parts which had panel lines filled and sanded, do the same and paint the remaining putty dull gray or yellow(mustard). Check the references - especially the Radinger & Schick book, pages 98 - 102. You can also cut decal strips to cover the panel lines then paint over them(see section about panel lines on page 8).
Another color confusion revolves around the late-war "green-gray" or "blue-green" underside color. A spurious RLM 84 designation has been used, but apparently with no solid research or basis in fact. Eye-witness descriptions vary. Some suggest RAF "Sky". Going on that, I mixed 2 parts Testors RAF Sky Type S, 1 part RLM 76, and 1 flat white.
For detail painting of the interior, follow the directions of the Trimastor DML kits, but always double check in your references. The best one I have is the MBI book: there are numerous color photos, as well as line and color drawings, of interiors, instrument panels, and landing gear bays. The book, "Me262 - Development, Testing, and Production" by Radinger and Schick, has some color photos of the gun bays as well. The color of the interior of the landing gear doors is somewhat confusing: one would naturally think they would be RLM 02, but most instructions show them as RLM 76. It is about impossible to tell from photos, due to shadows. Again, search for specific references, then guess.
I often refer to Xtracolor when talking about paints, but I have switched to Testors Model Master enamels. I am totally sold on them. The colors are good, and they mix and go on beautifully smooth with a good finish. They are listed by the RLM # and color names.
For other resources, see the internet resource page.
C. Stencils:
The Luftwaffe was generally meticulous about stencil markings on aircraft. The Me262 was no exception, with 25 different standard stencils, many multiplied a number of times, totaling well over 50 locations. The two following diagrams show stencil details and locations. However, it is known that many '262's were repainted in the field, or under "low quality control settings" like forest assembly plants, and under combat conditions, with pressure to "get them out the door". Many stencils were probably not put on, or were over-painted and not replenished. It is very difficult to know which to use, since most reference photos don't show this much detail. For the most part you just have to guess.
class=Section9>
This chart matches the number on Stencil list(Image #6) with the number on placement diagram(Image #7); and a description of the location.
1. - N/A - On outboard hinges of airleons and horzontal stabilizers
2. - N/A - Centered on underside of wing, outboard of engine.
3. - 9. - At tail attachment point both sides.
4. - 1. - Lower sides of nose cone and tail attachment, both sides.
5. - 12. - On access panel(starboard).
6. - 5. - Engine nacelle sides, and sometimes on top of wing.
7. - 3. - Below Gun access door
8. - 8. - Mail wheel hub
9. - N/A - Unknown placement
10. - 15. - Nose wheel hub
11. - N/A - Unknown placement
12. - 18. - On top of engine cowl, starboard
13. - 17. - Top of engine cowl, port
14. - 6. - 3 main fuel tank filler points
15. - 19. - Topside of wings, inboard
16. - 11. - Trim tabs
17. - 20. - Port outboard flap, topside, outboard edge
18. - 10. & 21. - Top of engine outlet cowl
19. - 7. - Port side, just below cockpit
20. - 4. - All steps, engine and fuselage
21. - 2. - Nose landing gear, front door
22. - 13. - Starboard fuselage, just above wing
23. - N/A - Under fuselage, midway rear
24. - N/A -
25. - N/A -
C. Canopy The canopies are quite nice on all these kits, including the Monogram. I guess that's why no-one has produced one in vacu-form. One problem that shows up on the Trimaster mold kits is too large a space under the front section, forward of the instrument panel. There should be a space, but not this big. Just fit in a small piece of sheet styrene filling the front part of the gap. Leave about 2mm gap fore of the instrument panel.
I have done canopy straps various ways. Thin strips of painted decal film are ideal, kind of like Fast Frames brand products, but a lot thinner. Anyway I haven't seen Fast Frames for Me262 kits yet.
I have done canopy straps various ways. Thin strips of painted decal film are ideal, kind of like Fast Frames brand products, but a lot thinner. Anyway I haven't seen Fast Frames for Me262 kits yet.
First, dip the canopy in Future Floor wax. Be sure to remove excess Future from the parts with tissue paper right away, and protect it from dust right away too. Allow them to dry thoroughly (overnight is best). Next, paint the decal film with whatever color and pattern needed, interior color first, then exterior. Allow the paint to dry. Then cut it in appropriate sized strips on a piece of glass or tile using a very sharp knife(new blade time, guys!). You can cut it with a scissors if you are steady enough. Carefully apply the strips. Add detail parts (photoetched levers, and handles), touch up the paint, then dip once more in Future. You've got to go back and put a line of paint (interior color) on certain edges, as well as matt varnish over the painted areas, since Future leaves a glossy finish. It's done!
More recently I have turned to the most realistic way: masking and painting. Attach and mask the clear parts and leave the frames unmasked, and paint the whole aircraft. The E Z Mask products are good for this for the Trimaster mold kits and for the Tamiya kit. Note though that on some aircraft photos show the frames black or RLM 66, not painted the camo colors.
D. Antennas etc.
You can add the finishing touches to your '262 after everything else is done by spending a little extra time on the antennas, pitot tube, and other small exterior details.
Most of the Trimaster/DML/Dragon kits have a nice photo-etched DF loop for the top and whip antenna for the bottom. Revell and Monogram is another story. For them, use a photo-etched aftermarket part, or even a mini staple bent into a ring. The FuG 25 antenna on the lower rear fuselage is provided with a thin (0.4mm) wire by Trimaster, but most others just have a glob of plastic. Put a piece of thin 0.4mm wire or equivalent, like electric guitar string (.010" up to .020"). The same for the pitot tube: Trimaster has a 0.6mm tube and 0.4mm wire. To replicate this, push a short piece of .010" electric guitar string through a thin steel or brass tube, either a syringe or aftermarket. Tamiya provides plastic parts for all of these, which can be used, but the alternative metal materials are still better.
The antenna wire can be added using nylon sewing thread, available in sewing sections. Stretched sprue can also be used. Drill holes in the top front of the vertical fin, in the top center of the rear fuselage, and in the top center of the rear canopy piece. Check references for the exact locations. Use a 1/64" drill or equivalent. Then just super-glue the nylon thread/sprue in place. On the canopy, use white glue. Super glue leaves a terrible fog on clear parts.
This is not an antenna, but should be added near the end: if you display the gun bay doors open, there are little lock-down clips that were extended when open. They are molded on the doors of the kits, but in real life were attached to the fuselage. Use a thin piece of photo-etch metal (0.5mm wide by 4mm long). Bend 1mm down at the top, and glue in place on the fuselage below the gun bays(check reference photos). The Verlinden set provides photoetched parts for these. The removable engine access hoods had similar pieces, but they are attached to the hoods. When the hood is removed, there is a gap on the lower nacelle.
KIT REVIEWS To see my models of these kits, look at my web page at www.oocities.com/stevescalemodels
I. Monogram # 5453 and #5410(original release) Me262A-1a Schwalbe
These came out in the 70's. Hasegawa/Revell re-issues are quite a bit more expensive but have better decals and instructions, that's all. I have built six of them: can't be all bad, since I keep coming back! The advantages of this kit are:
1. Cost (it's cheap, so if you want to build a big squadron, this is your best choice.)
2. Hmm. Can't think of anything else.
(INSERT IMAGE #8 HERE: Monogram Me262)


But seriously, if you know anything about Monogram kits, you'll understand. It's a nice kit for the money! (Which is not saying much - it's so cheap!) Easy to assemble, basically true to scale, several options, good fit(much better than the Trimaster molds). Sure, it has raised panel lines and the seat looks terrible, but the cockpit detail is a good starting point, and it has a fair Jumo engine included.
There are some really obvious problems, and some not so obvious, but those needing correcting are:
There are some really obvious problems, and some not so obvious, but those needing correcting are:
1. Cockpit detail: you need aftermarket photoetch(use Eduard # 48153 for this kit) and resin(Lone Star's cockpit). This helps to compensate for the seat and interior, as well as other problems.
2. Tires: not really needed but it is nice to get resin from True Details or Cutting Edge.
3. Decals: kit # 5410 has a nice variety of markings, but # 5453 has only one option, and are typical Monogram: kind of gummy and not exactly accurate. Besides, you can also get aftermarket.
4. The engine inlet cones have incorrectly shaped access caps: round instead of oblong. Use "Engines & Things" corrected inlets, # 48094, made for Hobbycraft Ar234. With a little sanding on the sides, these fit fine.
You know, I'm just wondering about the cost of all those extras: maybe its not such a good deal after all!
5. The raised panel lines are an advantage since they were filled and sanded on real airplanes. So you can just sand them all down! If you do, leave a VERY slight hint of the line, as many planes appeared.
6. The dihedral is way too low: warm the bottom wing in hot water and bend the outer wings up a little. Then a little wing root surgery, like sanding the root-end of the top wing pieces, you can gain enough dihedral.
7. The instructions seem to indicate that the torque links on the main gear legs go forward. They should go toward the rear, as shown in photos on pages 63, 72, 88, 92-93, and 99 in the Radinger and Schick book. It’s strange though that in the MBI book on page 57 are a couple of excellent close up photos apparently showing the torque links FORWARD! But they are photos of the Czech-built S-92, which may explain the variation.
8. Another mistake is the FuG 16 antenna(the one under the center fuselage) is indicated to be on the right: it is supposed to be on the left (starboard).
9. The weapons are pretty poorly represented. The bombs I guess are supposed to be 500 kg, which were rarely if ever used on these aircraft. It would be better to put 250 kg bombs on, from Verlinden or Kendall. And DON"T USE the bomb racks. They are awful. The same goes for the cannons and the R4M rockets. All of these weapons are available from either "Jabo" kit, and in the Verlinden set, and are of very good quality.
10. Be leery of any and all color designations given on the instructions by Monogram. Many are just plain wrong, and others are confusing. Those on the older kit, #5410, are better than the newer one, but still questionable. Check against other instructions and references. Or just ignore them all and use the Tamiya or Trimaster sheets. Also check the chart above.
II: Trimaster mold kits: General Comments
In the mid to late 1980's, Trimaster company in Japan produced what were at the time the most detailed, complete and complex plastic model kits in 1/48 scale. They were all Luftwaffe subjects, including a number of Me262's. The company went out of business by the early 90's, perhaps because the kits were very expensive to produce and costly at the counter. But, good thing that the molds were sold (and re-sold) and re-issues have been coming out ever since, first from DML (now Dragon), as well as Revell AG and Italeri.
The original Trimasters are expensive and hard to come by now, but can be gotten from collectors here and there: consistently on eBay, and occasionally from major companies. The same goes for the DML/Dragon, Revell and Italeri: most are OOP, but show up on the market here and there
Overall these are excellent kits. The major difference between the original Trimasters and the other companies is the amount of multimedia parts provided. Trimaster put in copper tubes for flash suppressors, steel tubes and wires for pitot and antennas, cast metal landing gear struts, seats, guns, weights for the nose(if yours doesn't come with it, make sure you put some weight in them, about 15 grams), and more photoetched parts. All together these parts really add to the quality of the model. The re-issued kits had different amounts, and the later ones had none at all(Revell and Italeri). They all have clear navigation lights, and also vinyl tires included. I usually use them, even though some people complain that the vinyl itself deteriorates and also degrades the styrene hubs. I have not seen it happen, and I have some kits sitting on these tires for close to 10 years. Use resin replacements just in case. DML/Dragon usually has some PE parts. Most have a figures or two: a seated pilot and a standing ground crewman, or two ground crewmen.
There are several problems with these kits fit problems that have given the Trimaster molds a bad name. They may be enough to scare off the inexperienced modeler, but with some detailed instructions, the problems can be overcome. After experience with several of these kits, I found several techniques to get around the problems. Also I have found several other reviews on the internet(see the reference page), which have helped me to refine my methods. I present to you here a synthesis of approaches, all of which I have tried and found helpful.
1. The main fit problem is in THE MATING BETWEEN THE WING AND THE FUSELAGE ASSEMBLIES. It has been consistently problematic on all the kits, including reissues. There are several causes to this: besides the misshaped mating surfaces, the cockpit assembly, bulkheads, and main wheel wells all seem to interfere. Also the belly doesn't want to line up, especially at the back of the wing. This is a related problem and can be fixed at the same time. There are two ways:
Method #1:
*Cockpit and Bulkheads: don't glue the cockpit tub to the bulkhead in front of it, as the instructions indicate. Put the bulkhead in separately, then sand the front wall of the cockpit tub down to about 1mm. Then glue the cockpit assembly as high up and far forward as possible. Keep checking the fit along with the rear bulkhead (which is attached to the wing assembly).
*Main Wheel Wells: These parts have to be completely pushed down into their spot. Then, when glueing the wings together, make sure that the well assemblies don't push it out of shape.
*Belly: The fuselage rear of the wing attachment point is slightly out of shape and affects the wing attachment. It tends to end up rather V-shaped instead of slightly rounded like it should be. For that the best thing to do is to make a bulkhead or two in order to keep the correct shape.
Cutaway drawings from the MBI book "Me262" help get the correct shape though they must be increased to the correct scale. Also one could use the kit supplied rear bulkhead as a basic pattern and reduce the size to fit. Make bulkheads from thick styrene or better yet something at least 1/8" (3mm) thick. I used clear acrylic sheet. Insert before assembling fuselage halves, but the key here is, "dry fit, dry fit, dry fit".
Once that is done, before attaching the wing assembly, put some sheet styrene reinforcement inside on the bottom of the fuselage, where the assemblies join at front and back. Be careful that these do not interfere with the other parts: bulkheads and landing gear well parts. It is still tricky to get both the top and bottom wing/fuselage joints to line up right. What am I talking about? It's more than tricky, it's downright impossible.
Once that is done, before attaching the wing assembly, put some sheet styrene reinforcement inside on the bottom of the fuselage, where the assemblies join at front and back. Be careful that these do not interfere with the other parts: bulkheads and landing gear well parts. It is still tricky to get both the top and bottom wing/fuselage joints to line up right. What am I talking about? It's more than tricky, it's downright impossible.
The only way to fix this is lots of sanding - or try method #2! You may find that front of the inboard wing sections don't meet together - they need some filler on the leading edge. A thin piece of sheet styrene will do it. Check the width relative to the engine nacelles, too.
*Dihedral: needs more. Weight the fuselage slightly, and support the wing tips when joining the two assemblies(in other words let the plane hang by the wingtips while the glue dries).
Method #2:
Method #2:
Do all the same steps as above, except instead of gluing the wing assembly together, glue the top wing sections to the fuselage first separately. Make sure that you put the wing sections on EXACTLY in the right positions. Let the glue cure completely(24 hrs +). Once that has cured completely, then the tops and bottom can be glued together, starting at the wing tips. I have done it the other way around, i.e. gluing the bottom section to the fuselage first, then the top, but that creates the same problem and the top wings don't line up.
Caution is needed when joining the tops and bottoms together, in order to get them lined up perfectly. They tend to get out of position near the tips. Also add thin strips of sheet styrene as spacers between the leading edges, inboard of the engine nacelles, just as in method #1. Any flight surfaces must be removed after assembly - although you should scribe the separation lines well first. Also carefully set the dihedral again.
2. Another problem is the vertical tail: it is much too wide once assembled. Before gluing the fuselage together, scrape and sand the inside to thin it down. Try to get it to be the same thickness as the separate rudder. The Monogram and Tamiya kits are better for this. Use them for reference.
3. The main landing gear is problematic, too. First, you need to get a good reference to show the correct angle. The Trimaster and the Monogram instructions are adequate. The main struts on these kits seem to go on with too much inward angle. Trim the tabs on the tops of the struts EVER SO SLIGHTLY to get a less pronounced angle. Then the secondary struts seem to be too long, so should be trimmed back again EVER SO SLIGHTLY. Keep checking, then let that glue totally dry before disturbing.
Also the molded on torque links need help. They need to either be replaced with photo-etched (although they are too thin), or better yet you can drill two holes in each side of each kit link: see image #7 for details. Also, make sure to place them the right direction: the torque links are towards the BACK(see note on this subject for the Monogram kit).
Image #9 Main Landing Gear Leg(Seen from Rear)

(-NOTE TORQUE LINK DETAIL: most P E sets provide torque links)
Note that the front wheel swivels, below the oleo shaft. Positioning it slightly turned would be a nice touch. One other detail needed is brake cables for all the landing gear. Use very fine copper wire or solder (0.08 inch), cut to approximate size, paint it flat black, and apply to the struts as per references, using super or white glue.
4. Instructions: The instructions on most of these kits are excellent, except some of the color descriptions, which are hard to follow, and incorrect in some cases. But once you figure out, for example, which of the cryptic formulas given means RLM 66, 02, and so on, the worst is over. Use the paint chart above to identify the colors.
4. Instructions: The instructions on most of these kits are excellent, except some of the color descriptions, which are hard to follow, and incorrect in some cases. But once you figure out, for example, which of the cryptic formulas given means RLM 66, 02, and so on, the worst is over. Use the paint chart above to identify the colors.
5. Decals: Most of the Trimaster/DML decals are unusable, since the whites often are very yellowed. The smaller markings, such as the stencil markings, are good, often supplying both red and black. See Images #6 and 7 for stencil details. Swastikas need to be added for the DML/Dragon kits, since they're not supplied.
6. On versions that had the bomb or drop tank carriers, be VERY CAREFUL measuring and drilling the holes. Do it EXACTLY as shown on the instructions. Also watch that they all seat properly. They tend to leave gaps.
Specific Trimaster mold kits:
Specific Trimaster mold kits:
1. Trimaster # MA-16; DML #5515 & Revell/Germany #4509 Me262A-1a Nachtjäger
This is a unique and well documented aircraft. There is discrepancy between the various resources as to who flew it and when, and its equipment, but it seems clear that it was a test bed for the radar antlers, but that it was not equipped with the radar itself. Other single seat '262's were using "Wilde Sau" tactics as nightfighters, and this aircraft did so as well while testing the flight characteristics for the antennas.
This is the first Trimaster kit I built. It's a real dreamboat of a kit once you get through the fit problems. The weapons bay, for example, is a real jewel. Check your references carefully to add details such as pneumatic hoses and wiring harnesses. Add one hose to each gun, from the behind the breach down to the base. I used either fine solder or copper wire. Paint them flat black. The electrical wiring harnesses coming off the bulkhead connectors are khaki. I used fine thread and some copper wire(see photos in the gallery). I didn't reposition any movable flight surfaces on this one. I learned to do that after this kit was done, and haven't brought myself to attack it yet. But I hope to do so!
Paint: RLM 76 Lichtblau is the bottom side color, and the camo pattern topside should be the early RLM 74-75 pattern (too bad I followed the kit instructions and painted it 81-82, late pattern). RLM 66 was used for interiors, along with RLM 02 for inside landing gear doors. As with all my kits, I made my own masks for the splinter pattern. The radar array is quite fragile, so handle with care.
The DML reissue has much the same as far as photo-etch and details, plus something the Trimaster doesn't have: two Jumo 004 engines! It is a nice option, although they are somewhat lacking in details, as are the insides of the nacelles. If displaying a '262 with engines exposed, use the Verlinden set for more realism. Also the Eduard PE set 48153 has internal nacelle parts - bulkheads and ribs. DML's decals are poor: no swastikas and the whites are very much yellowed. Revell has some strange decal variations: the "V 056" markings are outlined in black: that is incorrect. These decals are not found anywhere else, either. But Revell has all the weapons options of the Jabo kit(bombs and rockets)- but no engines; nor does it have photoetched parts. The plastic antennas are poor in comparison. Get the Eduard PE set 48205. Also the Revell decals for the V056 are incorrectedly outlined in black. I built my Revell kit as an A-2a reverted to fighter status using Experten decals ED-2a, and I put it "in-flight mode". I also did all the work of covering up most of the recessed panel lines using decal strips(see the photo gallery).
2. Trimaster MA10 & DML #5523 Me262A-1a/U4 "Pulkzerstörer" (Pack Destroyer)
This aircraft, V 083 is the second of this type, and was flown by Major Herget. He intercepted a pack of B-26 bombers on April 16, 1945.The assembly is straightforward, pretty much the same as previously mentioned. The gun is different, obviously. It could use some detailing, such as the addition of a pneumatic hose from underneath to the breech. Also, I used Bare Metal foil for the silver part near the base of the barrel. There is a turned metal barrel available from Modelblau at www.modelers-paradise.com . A caution: years after I finished this kit, I noticed that the gun was pointing downward. I think that it was an error in my assembly, so watch out for it not to repeat my mistake. Another difference is the nose landing gear assembly. The instructions are quite clear on this.
(INSERT IMAGE #10 HERE: “Trimaster Me262A-1a/U4 "Pulkzerstörer"


Paint: topside RLM 81 Brunviolett and RLM 83 Dunkelgrun as indicated in the instructions. One variation: from the line of the nose assembly forward, it should have a slightly different shade of RLM 81, or at least with a little more gloss, and a slightly lower demarcation line. This is due to the fact that the nose assembly was a separate piece added on. Also the nose tip should be completely brown.
3. Trimaster MA11 & DML # 5529 Me262A-2a/U2 "Schnellbomber"(High speed Bomber)
3. Trimaster MA11 & DML # 5529 Me262A-2a/U2 "Schnellbomber"(High speed Bomber)
This is the second aircraft of this type(V 555). It was tested but never used in combat.
Again, assembly is pretty much the same as above, except that the fuselage halves are trickier to join because of the large open part in the front. Start at the back and work your way forward, inserting sub-assemblies as you go. Also, painting and attaching the nose sphere and bombardier compartment cover requires some extra care. The bombs, bomb carriers and bomb sights are straightforward and go on well. This aircraft is all RLM 81 topside.
4. DML/Dragon kit # 5519 - Me262B-1a/U1 Nachtjäger
4. DML/Dragon kit # 5519 - Me262B-1a/U1 Nachtjäger
This aircraft could be called the definitive nightfighter of WWII, and was the first fully operational jet nightfighter. In spite of being few in number and hampered by lack of fuel, enemy air superiority, and technical disturbances, it was highly successful. "Red 10" was flown by Kommando Welter and the 10./NJG 11 in the final months of the war. This kit is Trimaster style, with all the moldings and parts following the same pattern, but apparently was never released by Trimaster before they went out of business. I would have loved to see what they would have put in this kit. It went OOP but has been re-released.
According to the kit instructions(as well as Hasegawa's 1/32 and 1/72 kits), the top weapons were eliminated(maybe built from A-2a versions?), and the bottom 30mm cannons were replaced with two 20mm MG151's. However, photographic evidence does not support this change, with the exception of the well known "Red 6", AKA "Red 306", which may have had the armament changed after capture. I followed the kit instructions on this matter and put in the 20mm cannon barrels. I now realize that I shouldn't have. It should be built with two or four 30 mm cannons. Anyway, I added gun barrels from Accurate Tubing. Also I used guitar string (.010) wire for radar array instead of the plastic ones in the kit. Make sure you varnish or paint the strings. They will discolor with time if you don't. Otherwise, construction is the same as described above, with the addition of radar operators compartment and equipment and a different canopy. This is all quite straightforward and easy to follow in the instructions. One item not clear, though, is the painting of the radar equipment. That information must be found in another resource. The MBI book is pretty good. Also see the Hyperscale reference in the Internet resource list.
According to the kit instructions(as well as Hasegawa's 1/32 and 1/72 kits), the top weapons were eliminated(maybe built from A-2a versions?), and the bottom 30mm cannons were replaced with two 20mm MG151's. However, photographic evidence does not support this change, with the exception of the well known "Red 6", AKA "Red 306", which may have had the armament changed after capture. I followed the kit instructions on this matter and put in the 20mm cannon barrels. I now realize that I shouldn't have. It should be built with two or four 30 mm cannons. Anyway, I added gun barrels from Accurate Tubing. Also I used guitar string (.010) wire for radar array instead of the plastic ones in the kit. Make sure you varnish or paint the strings. They will discolor with time if you don't. Otherwise, construction is the same as described above, with the addition of radar operators compartment and equipment and a different canopy. This is all quite straightforward and easy to follow in the instructions. One item not clear, though, is the painting of the radar equipment. That information must be found in another resource. The MBI book is pretty good. Also see the Hyperscale reference in the Internet resource list.
Paint: topside: I used Xtracolor RLM 76, with a mottle on top of RLM 75 Grauviolett, and a few spots of RLM 02 Grau and 80 Grun. The bottom is distemper black, roughly applied over the original RLM 76. Important to note is the variations that existed in the painting of the individual aircraft of this type. Each one of the approximately 10 delivered was painted differently. The upper wing and horizontal tailplane surfaces of most were left in their original paint. However, in the case of "Red 10", they were painted like the fuselage. Some also say that the fuselage is really RML 76 painted over the original colors, with patches showing through! Very well may be. That would be an interesting painting project. Decals are included for "Red 10" and "Red 8". With modifications and other decals you could build the trainer version.
5. Trimaster MA-12 & DML #5507 Me 262A-1a and A-2a Jabo
5. Trimaster MA-12 & DML #5507 Me 262A-1a and A-2a Jabo
I have built one of each of these kits, which are identical except the DML version has no soft metal parts, metal tubes, or wire included, which the Trimaster kit does have. Also, the Trimaster also has more photoetched parts; the decal sheets are the same except that DML's has a very strange dark blue color - almost black - for the fuselage band, and Trimaster has swastikas.
Both have two 250kg. bombs, Wfr.Gr. 21 mortar rockets and R4M rockets for under the wings. Note though that the color schemes are poorly indicated in the DML instructions: it has incorrect green on the "Red 13" option (should be RLM83Dunkelgrun, not a light green as indicated). It even reverses the locations of the colors on the fuselage of the "Yellow 7" option shown. Use other resources. Anyway, to match the bomber version, I painted RLM 81 & 82, then gave it swaths of white winter paint, very roughly applied. Decals are from the DML kit, plus KG51 emblems from an old Superscale sheet (#48-88)
My Trimaster buildup represents "Green 1" of III/JG7. It had the mortar rockets mounted on the bomb racks under the nose, and an unusual camouflage scheme with stripes of black green(RLM 70) and light green(RLM 82) with a very low demarcation line. A photo of it is in the Radinger and Schick book, page 66 & 67, and a painting is on the cover of Schiffer's "JG7" book. I obtained the decals for this specific aircraft from a source that I highly recommend: Cutting Edge Decals, set # 48054. They are beautifully made, and high quality with easy application, and excellent instructions.
(INSERT IMAGE #11 HERE: “Trimaster Me262A-1a "Jabo", with Cutting Edge decals


6. Dragon #5535 Me262 A-1a/U3 Photo-Recon
All Dragon did to make this kit was take out the extra weapons from the Jabo kit, and stick in the following parts: two round clear plastic lens covers(which you are supposed to glue in an imaginary place underneath the nose), bulges to represent the camera fairings(made to glue on the bumps on the gun bay covers), and blanks for the cannon barrels and cartridge chutes. But no cameras! Rats!. Also they threw in a small extra decal sheet with numbers for five different planes. The instructions indicate all these changes. But watch out: they tell you to put the cannons in. DON'T. You can however, put in a single cannon barrel in the extreme nose, as some planes had. Check the references, especially Radinger and Schick, page 90, for color photos. This kit has no photo-etched parts. Use the Eduard 48205 set and/or the Verlinden set to spruce it up. I used the internal radio and navigational equipment parts from Verlinden, and a lot of PE from both. Note that the Airwaves set #48033 set only has the resin nose bulges.
If you want to make your own cameras and display the bays open, as I did, start with some research: for example, there are good photos in the Radinger & Schick book, pages 74 and 90. They show the two part cameras: the body which are simple boxes, with misc. plumbing added on; and the film cartridges, which are fairly flat with some gadgets on top. The rear bulkhead should be stripped of the wiring harnesses, and correct wiring added. The Czech Master kit has all these parts, though, in beautiful detail.
When opening the access hatches, it is necessary to cut the large distinctive camera fairings at the correct lines, then thin the insides down to the correct thickness. This is very touchy. One could form them with thin styrene, too. Then the inside of the doors need to be cut out, pretty much the whole section enclosed by the bulge. At the same time, I added the camera controls inside the cockpit using a small photo-etch switch panel. It was a guess since I could not find any information.
The instructions and box art give a pretty poor representation of the squiggly line paint jobs that these recce-birds had - the lines are too thick. Of course, the schemes were so hap-hazard, I should criticize the original painters, not those at Hong Kong Dragon. Ideally, one should find photos or a good color profile of a specific aircraft and paint accordingly. Even so, the color interpretations are tricky. I used some original color close-up shots from the Radinger and Schick book, page 90, and still had a hard time deciding on what shades of green to use. I finally settled on RLM 70 and 80 squiggles over a base coat of RLM 76. Perhaps RLM 82-83 would have been a better choice but with field applied camouflage, who know? This is the one where they painted right over the extended leading edge slats and everything. It has no number.
7. Me262 Mistel - Released in 2003 by Shanghai Dragon. Not reviewed.
III. Tamiya Kits
III. Tamiya Kits
#61082 Me262A-2a Hurrah! A new Me262 in 2002); 61087, Me262A-1a Fighter version - in 2003
When this kit was announced, some commented that we didn't need another Me262 in 1/48. But I was thrilled. Imagine a new all new tooling Me262 from Tamiya! This is a popular enough plane that Tamiya figured it would sell. I bet he was right.
Perhaps the biggest reason we needed this kit was for the fit. And Tamiya definitely comes through. There are slight deficiencies in details, but the near-perfect fit makes up for that.
This kit also has superior overall shape. The wings, for example, have the best representation of the correct dihedral. Here is a comparison of the dihedrals of the main kit types:
Monogram


Trimaster/DML/Dragon


Tamiya


At a first, overall view, one notices good detail and arrangement of parts. There are inserts for the shell ejector chute area, under the front fuselage, which permit a future recon version (Cutting Edge already has a conversion kit out for this!).
The cockpit is OK but with some glaring problems:
1. Exaggerated relief on the instrument panel. It is still usable, and comes with nice decals including the different colored instrument bezels. Or replace it with a photo-etched one from Eduard set #48205 - which will yield lots of other useful parts too. The other option would be to get the Cutting Edge resin set which replaces almost the whole cockpit - which would also solve some of the other problems...
2. No emergency bomb release lever, which is supposed to be on the right wall. Must be added from photo-etched parts.
3. No oxygen connector, also right wall: scratch-build with paper clip wire(see reference photos).
4. Incorrect control levers, left console - the molded on levers are all to short. Photo-etched pieces should be added.
5. Decal seat belts - UGGGG! Use Photo-etched.
The gun bay is great, except that the bulkhead control boxes are a little oversized, and could use wiring. The wheel wells have good inside detail, doors, etc., although it’s all somewhat simplified compared to Trimaster molds. I recommend adding wiring harnesses inside the main bays, as per reference photos. There are a number of mold ejector marks on the inside parts, also landing gear struts; these may need to be filled in. A nose weight is provided, and it forms an integral part of the front landing gear bay. Take care though to follow the construction sequence exactly and do not glue the gun bay and metal front wheel assembly in. If you do it will cause problems later.
The fuselage and engine nacelle interiors are all accurately detailed with structural ribbing: Makes me want to use this kit to display the engines wide open! A diorama is forming in my mind right now: a forest assembly plant; a plane in final assembly stage, both engines exposed(using parts from DML #5515, Verlinden's set and Eduard PE set #48153), nacelle panels strewn on the ground...hmmm. More on this to come.
On the fighter-bomber, there are only 2 cannons, with the top muzzle holes blanked off. The second kit Tamiya produced is a fighter with all 4 cannons. Both Cutting Edge and Eagle Editions offer a 4-gun nose part, to change the fighter-bomber to a pure fighter.
Clear parts are just about perfect. The windscreen has a small segment of the fuselage molded with it, which eliminates one joint line but adds another. It also requires that the part be added before painting. There is a nice mounting system for the armored glass, which eliminates the problematic gluing of other kits. Paint the frames of the armored glass BEFORE it is glued in. The canopy is designed to be posed in the open position. It lacks the detail of the Trimaster mold kits’ hinge and other details, though.
Just like the Trimaster line, there are recessed panel lines: but they are even thicker and deeper. Too bad you have to fill most of them in(see page 8).
To customize this plane, I would insist on the repositioning of the flight surfaces: slats, flaps and horizontal stabilizers. See the detailed description on pages 5 - 8, and use the same methods. One difference is that you will not have the fit problems, so no spacers are needed on the inboard slats; also the wings are reinforced with internal spars so that one can even cut off all the flight surfaces, and the wings retain their correct shape! WOW! But if you buy resin slat sets, select only those made for the Tamiya kit: Eagle Edition, Cutting Edge, and Wingz. The others are of different lengths.
The decals are typical Tamiya: good quality, color, and register overall. They are quite complete with stencils and swastikas. Each release has 3 different schemes. The instructions are also typically thorough Tamiya style, very detailed and accurate. The color configurations do not list RLM #s, only Tamiya’so own line.
Accessories and extra parts: These are the first Me262 kits to offer the Borsig RI502 RATO (Rocket Assisted Take Off) pods, which were used commonly on early fighter-bombers. This version also comes with a Kettenkraftrad and three figures! They are nice inclusions for display and diorama use, which is "a whole 'nother topic".
The need for additional detail parts, like photo-etch, is minimum, since most of the molded detail is adequate. There are even molded on gun barrel flash suppressors. I would recommend adding wiring and tubing in gun bay and wheel wells; a metal pitot tube; antenna wire; brake lines on all landing gear struts; plus the items mentioned above.
Tamiya 61091 Messerschmitt Me262 A-1a (Clear Edition)
This is comparable to the fighter kit, 61087, but with many clear parts and additional internal parts. When built, the 30mm cannons, gun bay, internal fuel tanks, the cockpit, radio and other internal equipment can be seen through the clear fuselage. The Jumo004B engines can be displayed in clear engine nacelles or on maintenance carts, which are included. R4M air-to-air rockets with launchers to be mounted under the wings, or W.Gr 21 air-to-air rocket-launchers to be assembled under the nose, are part of the kit. Nose wheel well comes as a die-cast weight. A pilot figure and newly designed decals for 3 different markings are included in the kit. The internal ribbing and many other details can be seen through the clear parts.
Now if you’re like me and don’t really want to build a model of a clear airplane, you still may want this kit since it has many internal parts that are otherwise unavailable. These can be used for dioramas and displays without succumbing to the “clear” temptation.
IV. CONVERSION KITS
1. ARBA Resin Conversion/Monogram #5453 Combination: Me262B-1a Trainer
If you want a Me262B-1a, you either have to buy the Dragon 2-seat nightfighter, or use any of the single-seaters, and convert it with one of the conversion kits. I chose the Arba conversion kit, which is made for building the Me262B-1a/U1 nightfighter using a Monogram single-seater. This was before the B-1a/U1 nightfighter was originally released by DML. That would have been easier, and if I had to do it over I would definitely start with the nightfigher kit. But this one was fun.
The Arba kit contains the whole fuselage (one piece resin), and all the resin and metal parts needed to convert to the nightfighter. All the resin parts are quite nice, except along the mold line low on the fuselage, which needs careful sanding. Also the fuselage tub supplied is molded from the Monogram kit(Ug.). The wings, engines, and horizontal stabilizers are indicated to be supplied from the Monogram kit.
The major structural difference between the night fighter and the trainer is the arrangement of the rear cabin. The rear seat is farther back in the trainer. To fit it in meant a lot of cutting out of solid resin material. If I had used the nightfighter kit, it would have been easier. See diagram #13 for correct placement. I needed to replace the radar equipment with a normal instrument panel, plus add a control stick and rudder pedals. See the below chart of parts and sources. Also, because of the Monogram parts, I had to deal with the incorrect seat and other in-adequacies. I scrounged the parts from the old Medallion Models set, from various photoetched sets, and from a Trimaster kit that my dog had chewed. (Really true! May she rest in peace). One would have to use a combination of the following: the Verlinden set, a Lone Star cockpit, two Eduard PE sets, and two Reheat Luftwaffe accessories PE sets. See the list, below.
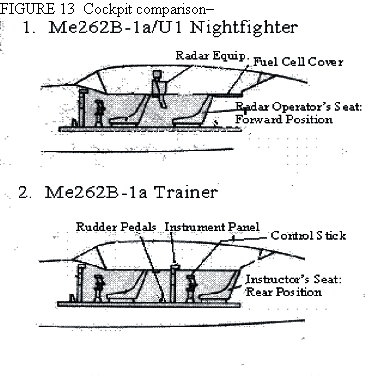

You have to drill out the cannon ports, cartridge chutes and nose camera hole. The vacuformed canopy is nice, add photoetched accessories to approximate the real thing.
The specific aircraft I did was "White 35", which was captured by the USA at the end of WWII, and was on outdoor display for decades at Willow Grove Naval Air Station in Pennsylvania. I went to highschool near there and that plane was instrumental in my interest in the '262. It was in spurious nightfighter markings with fake antlers then, but in the mid 90's was lent to the "Me262 Project" as their main pattern aircraft. They have built 5 brand new '262's (read about it at www.stormbirds.com/project/index.html. The original Luftwaffe paint and markings have been replenished, and it has been returned the Navy and put on display again(seen by appointment only, though).
My replica is of the pre-capture bird, which was painted with normal day fighter colors. I used XtraColor RLM 80 Grun & RLM 81 Brunviolett topside. Inside - RLM 02 & RLM 66. Underneath: RLM 76. Its number decals were obtained from War Eagle's "Luftwaffe 2-seater" set. They are also in Ministry of Small Aircraft Production set #4824. For the markings it carried after capture, use the Ventura decals set.
(INSERT IMAGE #14 HERE: “Me262B-1a Trainer, Monogram kit with ARBA conversion”


Here is a list of the different parts and sources used on this kit.
Parts Kitbashed
|
Source
|
*Fuselage, incl. drop tanks & canopy:
|
ARBA resin conversion kit
|
*Wings, engines, horizontal stabilizers:
|
Monogram Me262A-1a
|
*Rear Cockpit(except seat)
|
Medallion Models Me262 Resin
|
*Front Cockpit, tires, rudder, main landing .
|
Trimaster & DML kit parts & spares gear doors, landing gear struts, seats, misc PE, etc
|
*Photoetched parts for cockpit:
|
Airwaves Me262 set
|
*Decals
|
: DML, War Eagle, XtraDecal
|
2. Lone Star Models “Four-In-One” multi-media conversion kit: (OOP) This kit was designed to convert the Monogram Me-262 to the A-1A/U3 or U4, the B-1a, or the B-1a/U4. It contains resin, vac and metal parts. The quality is so-so on most parts.
3. Black Eagle # 4804 Me262B-1a conversion kit (available from Meteor Productions)
This little set is specifically for changing a DML/Dragon Me262B-1a/U1 nightfighter kit to a B-1a trainer: it only contains the cockpit tub and other cockpit parts to make the rear instructor's cabin, nothing else. It is NOT to make a 2 seater from a single seater(I wish Meteor would put this information in their catalog). The parts are well made and I am sure they fit fine but I would not recommend it unless you are planning to use it strictly for the purpose for which it is made.
4. Antares Models #03 Mistel; HG-1; HGII, HGIII, WG, Lorin, etc. These folks from Argentina are producing new kits all the time. See their web page for availability. They supply nice resin, a bit expensive, but they give you options that are unavailable elsewhere.
4. Antares Models #03 Mistel; HG-1; HGII, HGIII, WG, Lorin, etc. These folks from Argentina are producing new kits all the time. See their web page for availability. They supply nice resin, a bit expensive, but they give you options that are unavailable elsewhere.
The Mistel kit contains only the trolley, and some support pylons. For this, use a Monogram kit on the bottom for the flying bomb, and a Tri - mold Me262A-2a/U2 clear nosed bomber for the top. Take a look at my adaptation of this on my web page.
Take a look at the other kits elsewhere on this site.
REFERENCES:
Fighter Pictorials "Broken Eagles #4: Me262A" by Carl Hildebrandt ; This short book has some good photos, a few color profiles.
Messerschmitt Me262: Development, Testing and Production. By Willy Radinger and Walter Schick; Published by Schiffer. Excellent resources.
Messerschmitt Me262: Volumes I and II " The World's First Turbojet Fighter" By Manfred Griehl; Published by Schiffer. Good, but simplistic.
Other Schiffer Publications: JG7; Me262: Arrow to the Future
Messerschmitt Me262 by Miroslav Balous & Jirí Rajlich; Published by MBI. For a short book, this is an excellent resource.
Aero Detail #9 Me262A, published by Model Grafix
"Stormbird Rising" Osprey Books #408
Me262 Model Art #367
FineScale Modeler October 1997 Article on Scratch built Me262 1/32
Classic Publication: series of 4 LARGE volumes: the definitive resource on the Me262.
AJ Press: 2 part series on the Me262 in English
Eagle Editions, new Color profile book, summer of 2002 - Brett Green and Thomas Tullis !!!
"Stormbirds: Me262 Home Page": www.stormbirds.com
“The Me262 Australian Connection": http://www.ozemail.com.au/~fiveds/me262.html (has a review of the Tri/DML/Dragon kits at www.ozemail.com.au/~fiveds/trimaster.html )
IMPS modeling club website Walkaround- nice series on the ME262, good detail!http://www.ipmsusa.org/Walkarounds/Walkarounds.htm
IMPS modeling club website Walkaround- nice series on the ME262, good detail!http://www.ipmsusa.org/Walkarounds/Walkarounds.htm
Warbirds Resource Group: http://www.warbirdsresourcegroup.org/
Hyperscale Web magazine, at www.hyperscale.com, has many resources and reviews. The Resource page is:http://www.clubhyper.com/referenc.htm and the kit review page is: http://www.kitreview.com/reviews.htm
Hyperscale Web magazine, at www.hyperscale.com, has many resources and reviews. The Resource page is:http://www.clubhyper.com/referenc.htm and the kit review page is: http://www.kitreview.com/reviews.htm
Here are several Hyperscale pages of interest:
http://www.clubhyper.com/reference/luftcamdb_3.htm - Late War Luftwaffe colors
http://www.clubhyper.com/reference/luftcambg_6.htm - color reference chart
www.hyperscale.com/reference/me262tt_1.htm - The "Chequerboard" Me262's research
http://www.clubhyper.com/reference/me262bch_1.htm Me262B-1a/U2 resource AWESOME PHOTOS!!!!
http://www.clubhyper.com/reference/images/avia/S92.html - Czech Avia S92 page
http://www.kitreview.com/reviews/me262a2areviewbg_1.htm Review of the Tamiya “A-2a” kit.
Modeling Madness Web Magazine: http://modelingmadness.com/ has a lot of kit reviews on the Me262. Check the listing at http://modelingmadness.com/kitindex/kitindexmno.htm
Several of interest:
http://modelingmadness.com/reviews/axis/luft/wanta262v9.htm - review of the Antares HG1 conversion.
http://modelingmadness.com/reviews/axis/luft/shields262.htm, &http://modelingmadness.com/reviews/axis/luft/cleaver262.htm reviews of Tamiya '262 with added parts.
http://modelingmadness.com/reviews/axis/luft/gren262.htm review of the DML V056 model:
COLOR RESOURCES:
http://www.rlm.at/start_e.htm?archiv/rlm/rlm_e.htm&1 (or http://www.rlm.at/cont/archiv01_e.htm ) - lists RLM colors and paint brands
http://www.xs4all.nl/~rhorta/jgrlm.htm - RLM color chart