Barry is the master of the 1/72 BF-109 hands down. He has many greater tips. I put some together here.
Clear sealer and finishing coat.
Now on to painting. I use Gunze Sangyo paints exclusively. The base coats don't need much finesse; they are generally Gunze Lacquers, thinned about 5/1(thinner/paint). They dry very hard and are quite durable. The mottling is a different matter. I can't stress enough that you should use very thin paint. Here is my baseline: Gunze acrylic paint - 3 drops, Mr. Color Leveling Thinner - 12 drops, Gunze GX-100 clear lacquer - 2 drops, and finally Gunze Mr. Retarder Mild - 2 drops. This will be adjusted by a drop or two of thinner in the airbrush color cup, if necessary. I begin with 18 lbs, of air pressure, which will also be adjusted as necessary. Even with this very thin paint mixture, dried paint
often builds up on the airbrush needle. I keep a stiff paint brush handy to dip in thinner and clean off the needle. Generally this has to be done every 30 seconds or so.
Panel line wash.
Now the real fun begins. To some people the construction phase is their favorite part of building a model. To others, it's the painting. For me, it is the weathering; and I admit, I am still a student of the art. As I mentioned, this is a particularly grungy airplane.
Replicating it began with the painting; overspraying with lighter and darker tones, as well as patches and touch-ups on the wing and right tailplane. But now it's time to get dirty.
I start with the oil wash. I put a dab of white, black and burnt umber oils on a metal palette and a few drops of odorless thinner in one of the pans. I mix a rather heavy slop of the three colors and apply it to all panel and rivet lines. It looks ugly at the start.
Landing gear tips:


I made some progress on the canopy tonight. Prominent on the side glass panels of the 109 are two acrylic knobs. You grab them to pull the panels back to get some ventilation. They would be visible in 1/72, so I went with a tried an true method. First stretch a piece of clear sprue, then cut it into one inch sections. Slide the end of this piece near the candle flame and it will flair out into a tiny knob (or big knob if you're sloppy). Slice off two of the better ones (you'll need to make a few to find a few acceptable pieces), and attach with white glue.


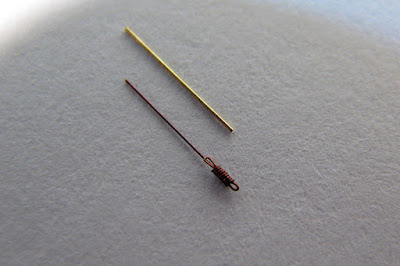
I've used my old technique of wrapping some VERY thin wire around a stiff thicker wire to make the spring. The same thin wire is rolled along a sheet of glass with a steel ruler to straighten it. This is a tip from Ray Rimmel; he used it to straighten fuse wire for rigging WWI biplanes. I cut some lager diameter wire to use as a template for the correct length of the retaining wire/spring. When a 109 model reaches this level of completion, there is no easy way to pick it up, let alone hold it steady while trying to thread a tiny, flexible piece through antennas, armored headrest and a precariously attached open canopy, only to find that it is .040" too long. This sturdier piece of wire allows me to cut the retaining cord to precise length before going through the nerve wracking gymnastics of attaching this nearly final piece. I've included a toothpick for size comparison.

Clear sealer and finishing coat.
Now on to painting. I use Gunze Sangyo paints exclusively. The base coats don't need much finesse; they are generally Gunze Lacquers, thinned about 5/1(thinner/paint). They dry very hard and are quite durable. The mottling is a different matter. I can't stress enough that you should use very thin paint. Here is my baseline: Gunze acrylic paint - 3 drops, Mr. Color Leveling Thinner - 12 drops, Gunze GX-100 clear lacquer - 2 drops, and finally Gunze Mr. Retarder Mild - 2 drops. This will be adjusted by a drop or two of thinner in the airbrush color cup, if necessary. I begin with 18 lbs, of air pressure, which will also be adjusted as necessary. Even with this very thin paint mixture, dried paint
often builds up on the airbrush needle. I keep a stiff paint brush handy to dip in thinner and clean off the needle. Generally this has to be done every 30 seconds or so.
Panel line wash.
Now the real fun begins. To some people the construction phase is their favorite part of building a model. To others, it's the painting. For me, it is the weathering; and I admit, I am still a student of the art. As I mentioned, this is a particularly grungy airplane.
Replicating it began with the painting; overspraying with lighter and darker tones, as well as patches and touch-ups on the wing and right tailplane. But now it's time to get dirty.
I start with the oil wash. I put a dab of white, black and burnt umber oils on a metal palette and a few drops of odorless thinner in one of the pans. I mix a rather heavy slop of the three colors and apply it to all panel and rivet lines. It looks ugly at the start.
 |
| Photo by Barry Numerick |
Landing gear tips:
The landing gear legs got a similar treatment. Here, Detail Master .007" wire was threaded through bits of Albion Alloys .3mm brass tube that were superglued to the LG legs. The same mix of oil paints was slopped in the recesses and wiped off with Q-tips. Problem areas were blended with a dry brush. The oleos were not painted; the silver is Uschi Van Der Rosten chrome powder applied with an artist's stump (or tortillon for those with culture). It is incredibly easy; there is no masking and you can keep polishing the powdered area for a glossier finish. I don't think I'll ever go back to Alclad or metal foil for this purpose. To my eye, this looks much
better.
better.

Paper seat belts for Out of the box
Finally the attempt at a new technique. I've never been satisfied with masking tape used to represent seat belts on out of the box builds. And decals are even worse. I started playing with this method in the "fat thumbs scale" (a former life, obviously). It showed some promise, so here goes. Caution: this is a quick proof of concept attempt, with brush painted acrylics. I would be more careful with a serious model.
First paint some paper tan (Tamiya instruction sheet feels about right). Then place some photo-etched belts on the paper and paint the area under the buckles silver. Tape the photo-etched pieces over the paper and spray the cockpit interior color more carefully than I did on this attempt. My thought is that you will be able to cut the paper relatively close to the belt, touch up the sides with RLM 66 (in this case) and apply with white glue. Since they are paper, they will qualify under IPMS out of the box rules. I'll post more about this as my OOB model progresses. Think it will be another 109?
First paint some paper tan (Tamiya instruction sheet feels about right). Then place some photo-etched belts on the paper and paint the area under the buckles silver. Tape the photo-etched pieces over the paper and spray the cockpit interior color more carefully than I did on this attempt. My thought is that you will be able to cut the paper relatively close to the belt, touch up the sides with RLM 66 (in this case) and apply with white glue. Since they are paper, they will qualify under IPMS out of the box rules. I'll post more about this as my OOB model progresses. Think it will be another 109?


I made some progress on the canopy tonight. Prominent on the side glass panels of the 109 are two acrylic knobs. You grab them to pull the panels back to get some ventilation. They would be visible in 1/72, so I went with a tried an true method. First stretch a piece of clear sprue, then cut it into one inch sections. Slide the end of this piece near the candle flame and it will flair out into a tiny knob (or big knob if you're sloppy). Slice off two of the better ones (you'll need to make a few to find a few acceptable pieces), and attach with white glue.


