Showing posts with label Barry Numerick. Show all posts

Wednesday, January 17, 2024

Barry Numerick Assembly note for the 1/72 BF-109F series

 As we all know Barry is the expert on buildings and creating amazing 1/72 scale BF-109s/

Here is his build comments on the Eduard BF109F


1. Painting the exterior of the gun troughs with the camo color before assembling the fuselage halves. This allows you to paint the guns before inserting them (with the unusual two part contraption that is the Eduard solution to gun alignment). I'm being a bit harsh here; I had a rather difficult time with the first 109 F I built, but these three were much easier. I even used the Eduard 3D. printed guns on one of the models. Although time saving and foolproof, it is not necessary. If you are VERY careful drilling out the kit guns, which is difficult given the soft plastic, you can achieve comparable results. But, as I said, the aftermarket part is foolproof.

2. Paint the wheel well area on the outside of lower wing first. Then separately paint the wheel well pieces and weather to taste. Do the same with the interior of the upper wing parts. Finally assemble all three. Here again, on one of the models I used Eduard's 3D printed inserts. This time they are definitely better than the kit parts. The stitching of the leather boots is beautifully rendered. They are also a bit more flexible which helps - because at least for me, the plastic inserts resist setting into their grooves perfectly. I used small clamps and 5-minute epoxy the tack on one side first. After that set up,  I removed the clamps and smeared more epoxy to firmly secure that side. Finally I repeated the process on the other end of the well. Several days of work, but there were no excess glue smears and the joint was very secure. I did find that the wells need some sanding to allow the upper wing to fit. This was easier on the 3D printed set. This may be operator error. Regardless, it would make sense to test fit and sand them down before gluing them to the lower wing. Notes made on the instruction sheet for future builds. 

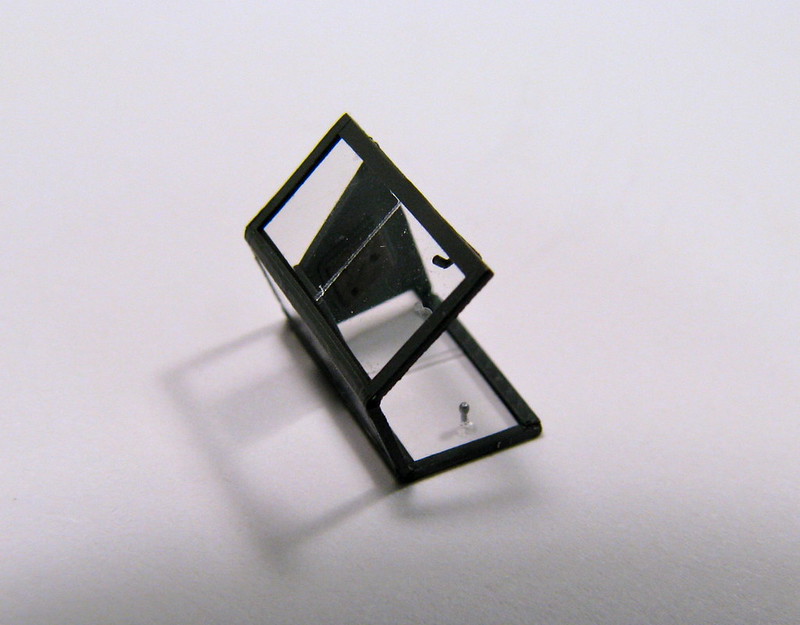
3. The clear wing tip lights are beautiful, but fiddly to the max. I drilled a hole in the back and forced some paint into it to represent the bulb. Per my usual habit, I then painted the rear of this part black, as well as the area of the wing tip where they will be inserted. A tiny drop of white glue held them in place temporarily. Then I applied black superglue (great stuff) to fill the joints. After setting with accelerator the excess was removed with a Q-tip and debonder. This worked better than my previous methods. 

4. Frustratingly, all three models suffered from FWS - Flat Wing Syndrome. Dry fitting the wings resulted in the fuselage sides pushing out the upper edge of the wings forcing them down. Again, this may be user error, but it happened with all three kits. No real problem, I just sanded down the fuselage wing roots a bit, allowing the wings to assume the proper dihedral. This may have been prevented by taping the lower wing to the fuselage and dry fitting the upper wings, but I didn't expect the issue to come up. Again, notes made on instructions for next time.

5. The horizontal stab is a single piece that slots into the fin, a nice touch. But the fit is extremely tight, to the point that if you dry fit it, good luck with getter it off again. I used a very thin file to open the fin slot a bit. Also note that there is a tiny mold defect on one of the elevators. Fortunately, this is intended to be placed on the bottom.

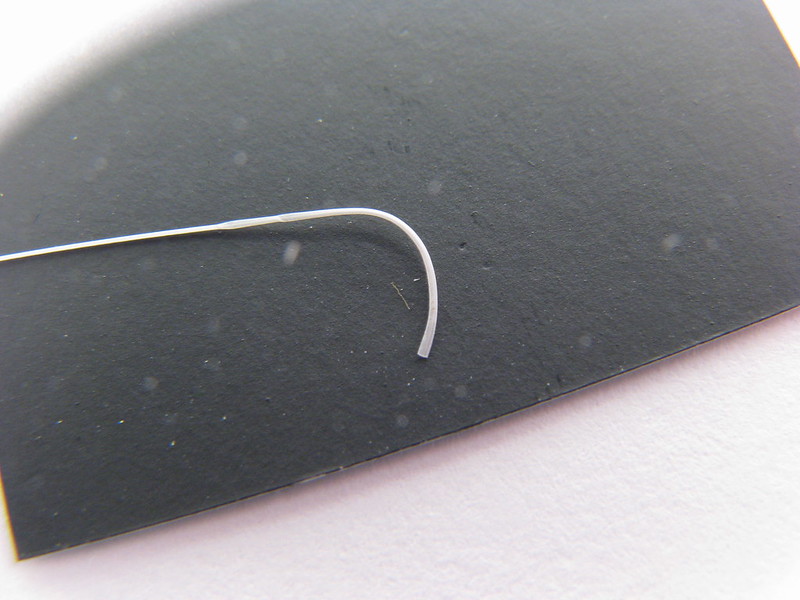
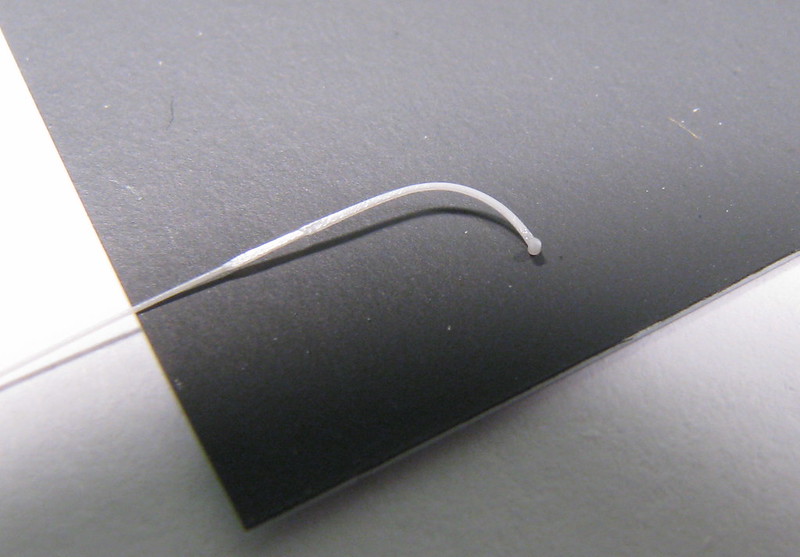
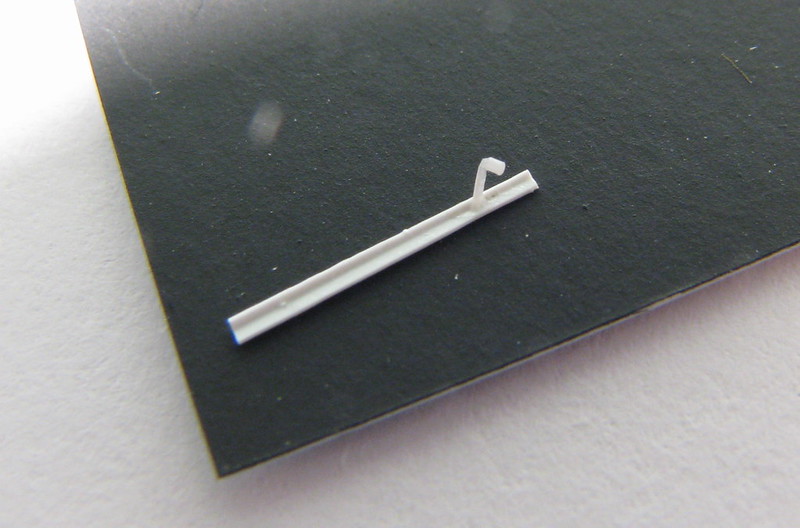
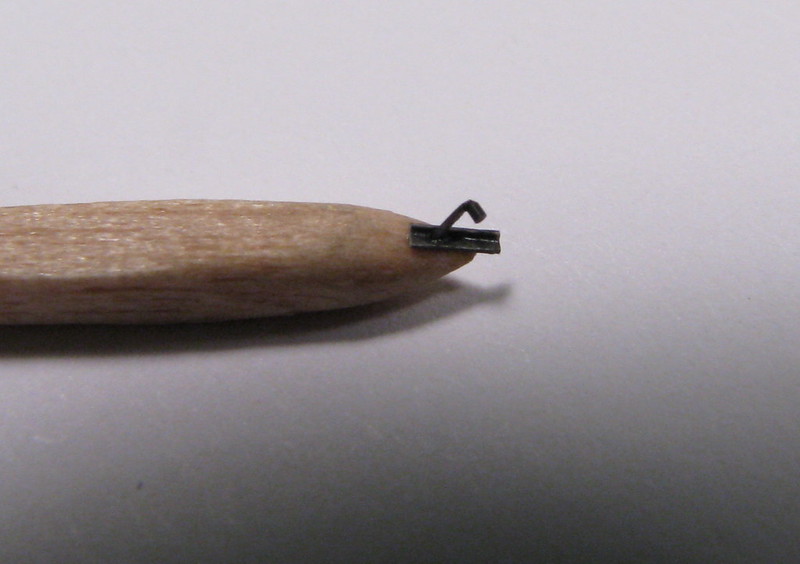
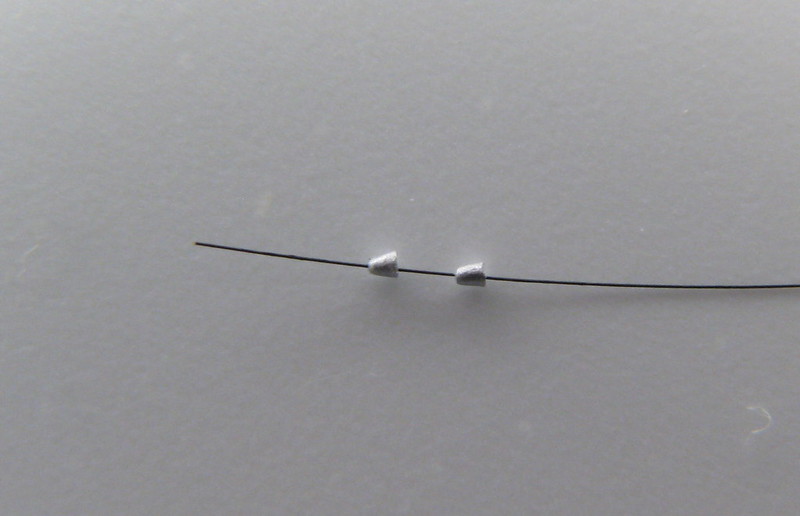
6. And finally - the fuel line through the cockpit. Eduard uses a clear part to represent this tube. An excellent concept, but ... clear plastic is very brittle. I have broken four of them. If you're very careful you can glue them back together, for a bit. Regardless, the limits of molding and practicality intervene and the tube appears too big when painted yellow. In the future I may keep the clear central section and form the remainder of the tube from thin solder. To tone them down, I used a lighter shade of yellow.

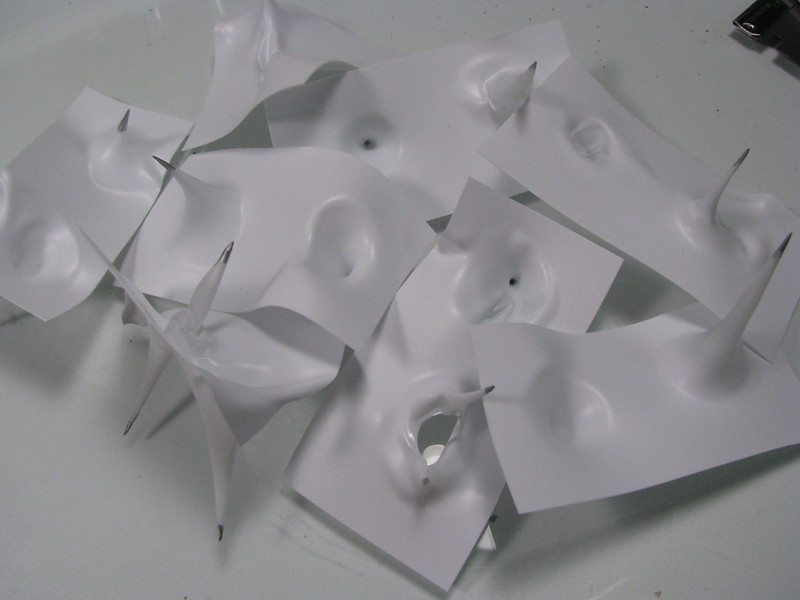
Here are a few more photos showing progress to this point. No clues as to the aircraft to be represented, but at least one of them is obvious!

I hope these tips will prove useful to first time 109 F builders, but then again, some  may be purely user errors.

Tuesday, September 19, 2023

Interview with Barry Numerick by Falkeins

 My good friend Falkeins published a great interview with Barry. The interview goes over Barry love of the BF-109.  As you would know I'm a big fan of Barry's amazing model skills. Plus his knowledge of all the 1/72 Bf-109 kits.  The article is from 2020.  I forgot to publish this, sorry folks

Building award winning BF-109's

 On my Blogs I follow you will find links to Falkeins blogs.  Take a look at at these blogs.


Barry's BF-109 collection

Barry's Awards

Friday, August 11, 2023

Barry Numerick 2023 San Marco Class winners

 Barry clean up again at the National.  Took four places. Correct the awards position's.


1st place out of the box

1st place in the what if class


2nd Place

1st place civil aircraft.


2nd  place inline axis

The what if in construction for 72nd aircraft forum


Monday, June 17, 2019

Scratch building a BF-109 canopy by Barry Numerick

A few tricks that some may find useful. A I mentioned, the canopy of the Tamiya 109 is rather thick. I was able to sand the inside on the rear section and polish it back up, but that proved impractical for the center section. I tried several different clear plastics from the stash and ended up using one of the less suitable, .015" Evergreen styrene. Butyrate would have been better, but I didn't have any at hand. Styrene tends to shatter or tear, but if you're careful, you can get acceptable results. Here's the first step. cutting the piece to the proper length and width, then gently scribing the centerline, which represents the individual panes.

IMG_5986 


Paint the edges with RLM 66. Don't worry about the ragged looking edges, they will be covered by decals cut into strips to represent frames. 

IMG_5995 


I wanted to represent the bolts on the base strips at the bottom of the canopy. I the old days when I modeled in 1/48, these would be made from bits of stretched sprue, but that really isn't practical in 1/72. I stumbled across this idea while practicing with Radu Brinzan's riveter. I consider this to be the best riveter on the market because the wheel is photo-etched steel and makes a VERY small rivet. Run the riveter across .005" styrene, flip it over and you get a very nice impression of bolts.

IMG_6039 


IMG_6030 


Spray the interior color and drybrush with light grey oil paint. Also, emboss the rivets, then cut the strip. Doing the reverse will severely distort the strip. Before applying with white glue, paint the reverse side also. Otherwise the white plastic will be reflected through the panel.

IMG_6024 


Finally, I wanted to represent the locking lever on the side of the bottom frame. An easy way to represent a flat, curved piece it to curl stretched sprue, then flatted it with a pair of flat pliers. The knob is a bit of stretched sprue. The handle is then glued to a bent piece of .005" sheet, painted grey and again white glued the the frame.

IMG_6036 


IMG_6040 


IMG_6041 


IMG_6043 


Here's the nearly complete canopy. Next will be the small knobs on the forward panel and applying Hans Fay's finger prints on the knob. Just kidding about the fingerprints, I have no idea what they looked like. 


IMG_6044 


...made the little knobs tonight so I decided to add them to this segment. They are thin sprue dipped in white glue. After drying I further dipped them in Metalizer non-buffing aluminum. Then snipped them off and attached them with more white glue. They may be a bit big, but they're the smallest of the 10 or so that I made and its difficult to work with anything smaller.

IMG_6050 

Barry's antenna insulator's for Bf-109

Mr Numerick how to make insulators for BF109 in 72nd scale


This is not some bizarre alien ( :lol: ) landscape, but many attempts to make the small cones that cover the ceramic doo-dads on the antenna. Hopefully this would be enough to get two acceptable parts. They were made by heating a small section of .010" styrene over a candle flame and then plunging a needle into the soft spot. Much like stretching sprue, you eventually get the feel for doing it.

IMG_6133 


I painted them metalizer non-buffing aluminum before cutting them off. They were removed with a straight edge razor blade. Then the small cone is put back on the tip of the needle and pressed into some sheet styrene. This allows the needle to poke a small hole in the tip. The only way to handle them at this point is by licking a fingertip and touching the part. Model identification by DNA testing can't be far off. Here are two of them strung on the stretched sprue antenna.

Monday, February 25, 2019

Barry Numerick's modeling tips

Barry is the master of the 1/72 BF-109 hands down.  He has many greater tips.  I put some together here.

Clear sealer and finishing coat.

Now on to painting. I use Gunze Sangyo paints exclusively. The base coats don't need much finesse; they are generally Gunze Lacquers, thinned about 5/1(thinner/paint). They dry very hard and are quite durable. The mottling is a different matter. I can't stress enough that you should use very thin paint. Here is my baseline: Gunze acrylic paint - 3 drops, Mr. Color Leveling Thinner - 12 drops, Gunze GX-100 clear lacquer - 2 drops, and finally Gunze Mr. Retarder Mild - 2 drops. This will be adjusted by a drop or two of thinner in the airbrush color cup, if necessary. I begin with 18 lbs, of air pressure, which will also be adjusted as necessary. Even with this very thin paint mixture, dried paint 
often builds up on the airbrush needle. I keep a stiff paint brush handy to dip in thinner and clean off the needle. Generally this has to be done every 30 seconds or so.


Panel line wash.

Now the real fun begins. To some people the construction phase is their favorite part of building a model. To others, it's the painting. For me, it is the weathering; and I admit, I am still a student of the art. As I mentioned, this is a particularly grungy airplane. 
Replicating it began with the painting; overspraying with lighter and darker tones, as well as patches and touch-ups on the wing and right tailplane. But now it's time to get dirty.

I start with the oil wash. I put a dab of white, black and burnt umber oils on a metal palette and a few drops of odorless thinner in one of the pans. I mix a rather heavy slop of the three colors and apply it to all panel and rivet lines. It looks ugly at the start.


Photo by Barry Numerick


Landing gear tips:

The landing gear legs got a similar treatment. Here, Detail Master .007" wire was threaded through bits of Albion Alloys .3mm brass tube that were superglued to the LG legs. The same mix of oil paints was slopped in the recesses and wiped off with Q-tips. Problem areas were blended with a dry brush. The oleos were not painted; the silver is Uschi Van Der Rosten chrome powder applied with an artist's stump (or tortillon for those with culture). It is incredibly easy; there is no masking and you can keep polishing the powdered area for a glossier finish. I don't think I'll ever go back to Alclad or metal foil for this purpose. To my eye, this looks much 
better.


Paper seat belts for Out of the box 
Finally the attempt at a new technique. I've never been satisfied with masking tape used to represent seat belts on out of the box builds. And decals are even worse. I started playing with this method in the "fat thumbs scale" (a former life, obviously). It showed some promise, so here goes. Caution: this is a quick proof of concept attempt, with brush painted acrylics. I would be more careful with a serious model.

First paint some paper tan (Tamiya instruction sheet feels about right). Then place some photo-etched belts on the paper and paint the area under the buckles silver. Tape the photo-etched pieces over the paper and spray the cockpit interior color more carefully than I did on this attempt. My thought is that you will be able to cut the paper relatively close to the belt, touch up the sides with RLM 66 (in this case) and apply with white glue. Since they are paper, they will qualify under IPMS out of the box rules. I'll post more about this as my OOB model progresses. Think it will be another 109?


I made some progress on the canopy tonight. Prominent on the side glass panels of the 109 are two acrylic knobs. You grab them to pull the panels back to get some ventilation. They would be visible in 1/72, so I went with a tried an true method. First stretch a piece of clear sprue, then cut it into one inch sections. Slide the end of this piece near the candle flame and it will flair out into a tiny knob (or big knob if you're sloppy). Slice off two of the better ones (you'll need to make a few to find a few acceptable pieces), and attach with white glue.


I've used my old technique of wrapping some VERY thin wire around a stiff thicker wire to make the spring. The same thin wire is rolled along a sheet of glass with a steel ruler to straighten it. This is a tip from Ray Rimmel; he used it to straighten fuse wire for rigging WWI biplanes. I cut some lager diameter wire to use as a template for the correct length of the retaining wire/spring. When a 109 model reaches this level of completion, there is no easy way to pick it up, let alone hold it steady while trying to thread a tiny, flexible piece through antennas, armored headrest and a precariously attached open canopy, only to find that it is .040" too long. This sturdier piece of wire allows me to cut the retaining cord to precise length before going through the nerve wracking gymnastics of attaching this nearly final piece. I've included a toothpick for size comparison. 


Tuesday, August 7, 2018

More 2018 national photos

Various sorts of face book 1/72 scale.   Barry Numerick Bf-109 did well at the nationals again.
He is the premier 1/72 Bf-109 modeler from the Three Rivers Pittsburgh  chapter. 


2nd Place Barry Numerick

2nd Place Barry Numerick


Wednesday, March 29, 2017

Who makes the best BF-109. Here is a list provide by Barry Numerick a Premier BF-109 modeler

   I have copied Barry's recommendation for 1/72 BF-109 to build.   His work on 1/72 BF-109 is amazing.  Now for his picks.

Barry Numerick amazing BF-109


 OK, I'll chime in here. 

V-1: prototype - MPM is the only game in town. Libor Jekl made an excellent model from this kit in the Valiant Wings publication on the 109 A-T series, so it can be done. 

A-D: At this point I would use the Heller kit. Its main drawback being a too-skinny nose. I've often wondered about slicing off the chin radiator, building up the lower fuselage profile with epoxy putty and reattaching the radiator, but that may not be necessary in the near future. AMG has done a very nice job on 1/48th Jumo powered 109s and promises to release them in 1/72. Sword, Avis and AModel are not worth the effort required to make them acceptable. 

E: Tamiya is the only game in town for me. ICM may have fixed the fuselage dimensions in the opinion of some, but I wonder if the whole issue is a matter of canopy placement, not length of the fuselage. I had done a review comparing the Tamiya & Airfix E's on the 72nd scale aircraft site, but Photobucket (@#(*&)_!@$*&^...) lost over 1,500 of my photos. Some of them may have been linked to that thread. I'm rebuilding them using Flickr, but that will take time. The Airfix kit looks short in the nose to me, but again, this may be canopy placement. Considering that the Tamiya kit is, well, a Tamiya kit, everything clicks together and makes a more that acceptable model. 

F- G: Fine Molds. Period. The Zvezda kit is very nice. One the plus side is a very reasonable price and good outline. The scribing is fine...very fine. On the negative, the prop is just wrong,as is the spinner. The canopy is wider than the fuselage at the rear end and is made from a plastic that really doesn't like the Bare Metal Foil that I used for masking. Oh, and since much of the wing is a single piece, there is a nasty sink mark mid way along the wing uppersurface. Curiously the German national insignia is precisely located there and tends to distract the eye from the problem. 


Late G and K: Again Fine Molds, hands down. AZ has made a valiant effort and their wing is nice, even including open inspection holes in the wheel well. The cockpit is also good. But the nose is unacceptably undernourished at the point of meeting the wing. I posted my corrections in a thread here, inspired by suggestions from my good friend, Woody Straub. Woody is an excellent builder and superb researcher. 

http://z15.invisionfree.com/72nd_Aircraft/ar/t4611.htm 

Also the fit is challenging to say the least, particularly in the cockpit area and fine details are fuzzy in comparison with Fine Molds. There are a number of areas where the AZ is, let's just say "inspired" by the Fine Molds effort; we'll leave it at that...(wheels). 

H: MPM made an effort at this one years ago and I combined their wing with a Hasegawa G-6 and Hawkeye Designs detail set, which actually worked. AZ has recently released this variant and if I were ever to do another one, I would combine their wing with a Fine Molds G-6. 


K-4: (see F and G) FINE MOLDS. Another beautiful effort with excellent outline, proportions and fit. There probably was no K-14, although some of the distinguishing characteristics (four blade prop and wing mounted 30mm cannon) may have been tested on K-4 variants. 


Me 209: For the V-1 and V-4 the Huma kits can be done up nicely. Special Hobby has promised one. Search Google for a superb Huma V-1 model by Woody Straub. The V-5 is another matter. I'm not pleased with this Huma kit and the resin kit from Kora has its own set of problems. I'm tempted to try a conversion of a Fine Molds G. 


S-199: Here the AZ kit is significantly better. I've built one and have several others on the way. Reduce the prop blades to a scale 10 Meters, taking off a little more than 1/16" from each. 


Buchon: There have been many terrible models of this one over the years, ranging from awful to Gawd-awful. The Special Hobby kit is just OK, but the upper cowl rocker covers are undernourished. 


So to sum up. To whomever did the Fine Molds 109 masters, a profound Thank You. It was a labor of love and it shows. Small details like the differences between the F, G & G-10/K props are perfectly represented as are the different oil coolers under the cowls. Some have said that they are too short in the nose or that the curves of the rear fuselage offend them. Hogwash. This model quite simply looks like a 109, from any angle. 


Here is one I recently finished: