This was posted on a Facebook page
Decals 101: Fixing "Silvering"
There are things you can do to limit decal "silvering", but eventually you will get some anyway.
- A glossy surface can help limit the amount of silvering, but some decals will still do it, even though the surface is glassy smooth.
- Lots of water when applying decals can help, especially making sure the surface under the decal is plenty wet before the decal covers it.
- Setting solutions can also help, but most are on top of the decals. The Micro-system places a surface prep solution on the model ahead of the decal, but even this is not always successful. While all the solutions melt the decal to help it conform better to the surfaces, they will not always resolve "silvering" on their own.
So how to fix it when it happens?
I stacked the deck here. I had a friend over on the weekend to talk about decals. I wanted to be sure to get "silvering". I applied a few SuperScale decals over flat paint and did not use any setting solution. I also applied a light flat clear coat over the decals to make the "silvering" really pop out. The shine of the decals can hide the "silvering" until you are near the end and do the flat coat. I got lots of "silvering". And, the "silvering" can still be addressed, even after a clear coat is done.
I have used this method for years. I works very well. Since David explained this much better than I could. I just borrowed for the Modeling tips.
The silvering is microscopic air bubbles under the decal. All three of these were "silvered" but I fixed two of them while my friend was watching on Saturday.
The silvering is microscopic air bubbles under the decal. All three of these were "silvered" but I fixed two of them while my friend was watching on Saturday.
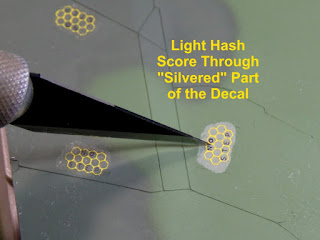
Step 1: Lightly hash through the silvered part of the decal with a new Xacto blade. Use just the weight of the knife. You only need to cut the thin decal film and not damage the painted surface. I hash the lines about one per millimeter.
Be careful on this. "Silvered" decals are not attached to the model where the "silvering" is found. If you are not careful with this step, the decal will break and flake off (game over).
This got messier than normal since I was brushing with my left hand while looking through my camera and taking the picture with my right hand. Touch just the ends of the hash cuts. Capillary action will draw the solution under the decal. Swab over the decal after capillary action has already got the solution to go under most (if not all) the decal.
Step 3: Evaluate the result. On tough decals, I may re-hash and re-treat the decals a couple times until I get all the "silvering" to disappear.


No comments:
Post a Comment